Why Air compressor installation Matters for Your Shop's Success

Air compressor installation is the foundation of a reliable compressed air system that keeps your shop running efficiently. Here's what you need to know to get started:
Essential Installation Steps:
- Calculate your CFM requirements - Add up tool demands and apply a 35% utilization factor
- Choose the right location - Ensure 3 ft clearance on all sides, 8.2 ft ceiling height, and proper ventilation
- Match electrical requirements - Verify voltage, phase, and circuit capacity before connecting
- Size your piping correctly - Minimize pressure drops (maximum 0.1 bar recommended) with proper pipe diameter
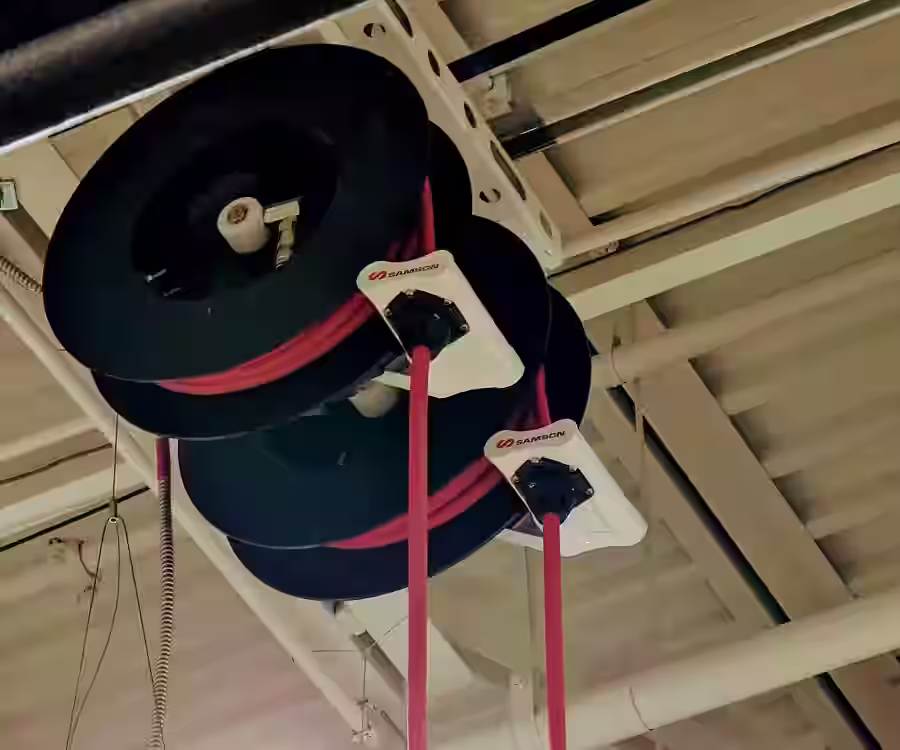
- Install receiver tanks - Place wet receiver before dryer, dry receiver after for optimal performance
- Test and maintain - Perform leak tests, drain condensate daily, and follow preventive maintenance schedules
As one installation guide notes, "Ask an off-roader, 'Which accessories on your build are the most useful?' and you'll get a handful of different responses – but on-board air will make the list every time." The same principle applies to automotive and industrial shops. A properly installed compressed air system becomes the backbone of daily operations.
The reality is simple. Poor installation leads to pressure drops that increase your compressor's power requirement by approximately 0.7% for every additional 0.1 bar needed. That adds up fast. High maintenance costs often stem from inadequate installation, poor water treatment, and filtration.
Getting it right the first time saves energy, reduces downtime, and cuts operational costs. Whether you're setting up a collision repair facility, an automotive service center, or an industrial workshop, understanding the fundamentals of air compressor installation protects your investment and keeps your technicians productive.

Planning Your Air compressor installation
Before we even pick up a wrench, we need a plan. You wouldn't build a shop without a blueprint, and you shouldn't install an air system without one either. Planning ensures that the machine you buy today won't be struggling to keep up by next year.
CFM Calculation and Tool Requirements
The first step in any Air compressor installation is determining your total air demand. This is measured in Cubic Feet per Minute (CFM). We start by listing every tool that will use air: impact wrenches, sanders, paint guns, and even the simple blow-off nozzles.
A common mistake is just adding up the CFM of every tool and buying a compressor that matches that total. But here’s a secret: you aren't using every tool at the exact same second. We use a "simultaneity factor" or utilization factor. For a standard shop, we typically use a 35% utilization factor.
The Formula:
- Add the CFM requirements of your most-used tools.
- Multiply that total by 0.35.
- Add a reserve for future expansion (usually 20-25%).
- Divide by 0.75 to ensure a 75% duty cycle (so the compressor isn't running 100% of the time, which leads to overheating).
If you’re feeling overwhelmed by the math, we offer expert Shop Design and Consulting to help map out your airflow needs perfectly.
Pressure Demand and Expansion Reserves
While CFM is about volume, PSI (Pounds per Square Inch) is about "push." You must identify the tool with the highest pressure requirement. If your tire changer needs 125 PSI, but your compressor only puts out 100 PSI, you're going to have a very long day. Most industrial reciprocating compressors operate at 175 PSI, while rotary screws often sit around 125 PSI.
Always plan for the future. It is much cheaper to install a slightly larger pipe or a more capable compressor now than to rip everything out and start over when you add a new bay.
Essential Steps for Air compressor installation
Once the planning is done, the physical work begins.
- Unboxing and Inspection: Check for any transport damage. It’s better to find a cracked cooling grill now than after it’s wired up.
- Foundation Prep: For industrial units, a level concrete pad is a must. Some compressors, like the Haas HAC15, weigh over 1,000 lbs. If the floor isn't level, use shims or leveling tools to achieve a stable base.
- Component Fitting: Install your intake filters, wheels (if portable), and vibration pads.
- Connecting the Lines: Use a high-quality Air System Hose Kit or Jumper Hose to connect the compressor to your main piping. Never hard-pipe directly into the compressor; the vibration will eventually cause the pipe to crack.
- Leak Testing: Pressurize the system and spray soapy water on every joint. If you see bubbles, you have a leak. Even a 3mm hole can cost you significant horsepower in wasted energy!
Selecting the Optimal Location and Environment
Where you put your compressor is just as important as which one you buy. We’ve seen compressors tucked into dark, dusty corners where they eventually "choke" and overheat.

The 3-Foot Rule
For proper cooling and maintenance, you need at least 3 feet (1 meter) of spacing between the compressor and any walls. This isn't just a suggestion; it’s a requirement for the cooling fans to move air effectively. You also need a ceiling clearance of at least 8.2 feet (2.5 meters). If you trap the heat in a small room, the ambient temperature will skyrocket, leading to oil degradation and premature failure.
Ventilation and Air Quality
Your compressor is basically a giant vacuum cleaner. It sucks in whatever is in the air. If your shop is full of sawdust or paint overspray, that’s going into your machine.
- Dust-free air: Ensure the intake is in a clean area.
- Temperature: The maximum air temperature at the intake should not exceed 46 °C (115 °F).
- Lighting: For safety and ease of service, the area should be brightly lit.
Environmental Impact on Performance
Did you know that elevation affects your air? If your shop is in a high-altitude area (above 3,200 feet), your compressor's performance may decrease because the air is thinner. Similarly, high humidity means your compressor will produce more water. In the Carolinas, where humidity is a way of life, we often recommend more robust Installations, Upfits, and Facility Buildouts that include advanced moisture management.
Electrical Requirements and Safety Standards
Electricity and compressed air are a powerful—and potentially dangerous—combination. Most industrial compressors require a dedicated circuit.
Voltage and Phase Matching
Before you order a Champion Air Compressor or a Quincy Air Compressor, verify your shop's power. Do you have 208V, 230V, or 460V? Is it single-phase or three-phase? Connecting a three-phase motor to single-phase power is a recipe for a very expensive "pop."
Electrical Safety
- Grounding: Every compressor must be properly grounded to prevent shocks.
- Isolator Switches: You should have a visible disconnect switch near the unit so it can be powered down instantly for service.
- Local Codes: Always follow local electrical codes to ensure your insurance stays valid and your team stays safe.
Safety Precautions During Air compressor installation
Safety doesn't stop at the wires.
- PPE: During installation, we always wear Eye protection and Ear protection.
- Pressure Regulators: Never run a tool at a higher PSI than it's rated for.
- Safety Valves: These are your "fail-safes." Bench-test them before installation to ensure they'll pop if the pressure gets too high.
- Lockout/Tagout: If you're working on the system, make sure no one can accidentally turn it on.
Piping, Distribution, and Receiver Tank Configuration
The piping is the "veins" of your shop. If the pipes are too small, the air can't get to the tools fast enough, and you'll experience a "pressure drop."
Pipe Sizing and Pressure Drop
The goal is to keep the pressure drop across the whole system under 0.1 bar (1.5 psi). If you use a pipe that's too narrow, you're literally throwing money away. For most shops, we recommend a ring main (closed-loop) system.
Wet vs. Dry Receivers
An air receiver tank (or "storage tank") acts as a buffer.
- Wet Receiver: Placed before the air dryer. It helps drop out some moisture and cools the air.
- Dry Receiver: Placed after the air dryer. It stores the clean, dry air so it's ready for high-demand bursts.
Network Layout Comparison
| Feature | Closed-Loop (Ring Main) | Linear System |
|---|---|---|
| Pressure Stability | Excellent (Air flows from two directions) | Moderate (Pressure drops at the end of the line) |
| Efficiency | High | Moderate |
| Installation Cost | Slightly Higher (More pipe) | Lower |
| Best For | Large shops with multiple bays | Small, single-line workshops |
Pro Tip: Always slope your horizontal pipes slightly (1-2%) away from the compressor and put "drops" for your tools on the top of the main line. This prevents water from running straight into your Pneumatic Hose and tools.
Maintenance and Troubleshooting for System Longevity
Once your Air compressor installation is complete, the job isn't over. A compressor is like a car; if you don't change the oil, it will eventually stop.
Preventative Maintenance
We highly recommend signing up for Preventative Maintenance Programs.
- Daily: Drain the water from the tank.
- Weekly: Check for leaks and clean the intake filters.
- Every 6 Months: Change the oil and check belt tension.
- Air Quality: Follow ISO 8573 standards to ensure your air is clean enough for your specific industry (especially critical for paint and food-grade applications).
Common DIY Troubleshooting Steps
If things aren't running right, check these common culprits:
- Tripping Breakers: Usually caused by using an extension cord that is too long or thin. Plug the unit directly into the outlet.
- Weak Pressure: Check for leaks or a clogged Water Separator.
- Water in the Lines: Your dryer might be failing, or you aren't draining your tank often enough.
- Unusual Noise: Check for loose bolts or worn-out drive belts.
Professional vs. DIY Installation Benefits
While a DIY Air compressor installation is possible for a small home garage, industrial and automotive shops usually benefit from professional help. At AutoTech Solutions, our goal is to minimize your downtime.
We provide expert support across Michigan, North Carolina, and South Carolina. When we handle your installation, you get:
- Warranty Protection: Many manufacturers require professional installation to honor the warranty.
- System Auditing: We ensure your pipes are sized perfectly to save you energy.
- Fast Response: With locations in Novi, MI, Charlotte, NC, Raleigh, NC, and Wade, NC, we are never far away when you need Service, Repair, and Equipment Support.
Frequently Asked Questions about Air Compressor Installation
Where is the best place to install an air compressor?
Ideally, indoors in a separate, well-ventilated, clean, and dry room. This keeps the noise away from technicians and protects the machine from the elements.
Why is ventilation crucial for air compressor operation?
Compressors generate massive amounts of heat. Without proper ventilation, the room temperature rises, the oil thins out, and the machine will eventually shut down or seize.
How do I determine the correct pipe size for my air system?
It depends on the CFM flow and the length of the run. A general rule is that the longer the pipe, the larger the diameter needs to be to prevent pressure drops. For most professional shops, a 1-inch main line is the minimum starting point.
Conclusion
A successful Air compressor installation isn't just about plugging it in; it’s about creating a system that is efficient, safe, and built for growth. By focusing on proper CFM calculations, choosing a well-ventilated location, and using the right piping configuration, you ensure your shop stays productive for years to come.
If you're ready to upgrade your shop or need a professional eye on your current setup, Contact Us today. From Robinair Products to full-scale facility buildouts, we are here to keep you compressed and moving forward.