Why Professional Car Lift Installation Matters for Your Shop
A professional car lift installation is the backbone of a safe, productive, and compliant commercial service bay. For busy shop managers, getting a heavy-duty lift online quickly and safely requires meeting strict physical, electrical, and structural standards.
If you need a quick overview of what a compliant, professional installation requires in 2026, here is the essential site checklist:
- Concrete Foundation: Minimum 4-inch depth (6.5+ inches for heavy-duty lifts over 12,000 lbs) with a compressive strength of at least 3,000 PSI, fully cured for 28 days.
- Ceiling Clearance: Standard two-post lifts require 11.5 to 12 feet of clear overhead space, while larger commercial models require 13 to 14 feet.
- Power Supply: Dedicated 208-230V single-phase or three-phase circuit with a 20-30 amp double-pole breaker.
- Safety Certification: Compliance with ANSI/ALI ALCTV standards is required by building codes and insurance policies to protect your technicians and your business.
Attempting to cut corners on these specifications can lead to structural failure, voided equipment warranties, and severe workplace hazards. For commercial facilities, having factory-trained technicians handle the process ensures your equipment is anchored, calibrated, and certified for daily heavy-duty use.
Pre-Installation Planning and Site Qualification
Before a single piece of equipment arrives at your commercial facility, a comprehensive site qualification must take place. At AutoTech Solutions, we emphasize that site preparation is where the safety and longevity of your lift are actually decided. Failing to verify your floor specs or bay clearances beforehand can lead to expensive delays, structural failures, or code violations.
Concrete Thickness and Compressive Strength
Your concrete slab is the literal foundation of your lift’s safety. For standard commercial two-post lifts rated between 7,000 and 10,000 lbs, the baseline requirement is a minimum of 4 to 4.25 inches of concrete with a compressive strength of at least 3,000 PSI. However, for heavy-duty commercial lifts (12,000 lbs to 18,000 lbs and up), you will need a slab thickness of 6.5 to 8 inches with a compressive strength of 3,500 to 4,000 PSI.
If you are operating in an older facility or are unsure of your slab’s history, we highly recommend having a concrete testing company perform a core drill test. Spending $150 to $300 on concrete core testing prevents the catastrophic scenario of anchoring a heavy-duty lift into substandard, thin, or crumbling concrete. Furthermore, if you have recently poured new concrete bays, you must allow a full 28-day curing time before drilling or anchoring.
Ceiling Clearance and Bay Dimensions
To determine if a lift will physically fit your workspace, you must measure the usable height from the finished floor to the lowest overhead obstruction. This includes garage door tracks, overhead lighting, heaters, and structural beams.
For standard two-post lifts, a minimum ceiling height of 11.5 to 12 feet is required to lift passenger vehicles comfortably. If your shop services high-roof transit vans, work trucks, or commercial buses, you will need 13 to 15 feet of overhead clearance. Additionally, your bay width must accommodate not only the physical width of the lift (typically 10 to 11.5 feet outside-to-outside) but also provide a minimum of 2 to 3 feet of walk-around clearance on either side of the columns.
Electrical Requirements
Commercial lifts are high-demand machines. Most standard single-phase two-post lifts require a dedicated 208-230V circuit on a 30-amp double-pole breaker. Heavy-duty three-phase systems, common in larger fleet operations, require specialized commercial wiring. All power supplies should be run to the main power-side column by a licensed commercial electrician to ensure compliance with local electrical codes and to preserve your manufacturer’s warranty.
For a detailed breakdown of site readiness parameters, consult our Automotive Lift Installation Guide and review our established professional lift installation standards.
The 7 Steps of Commercial Car Lift Installation
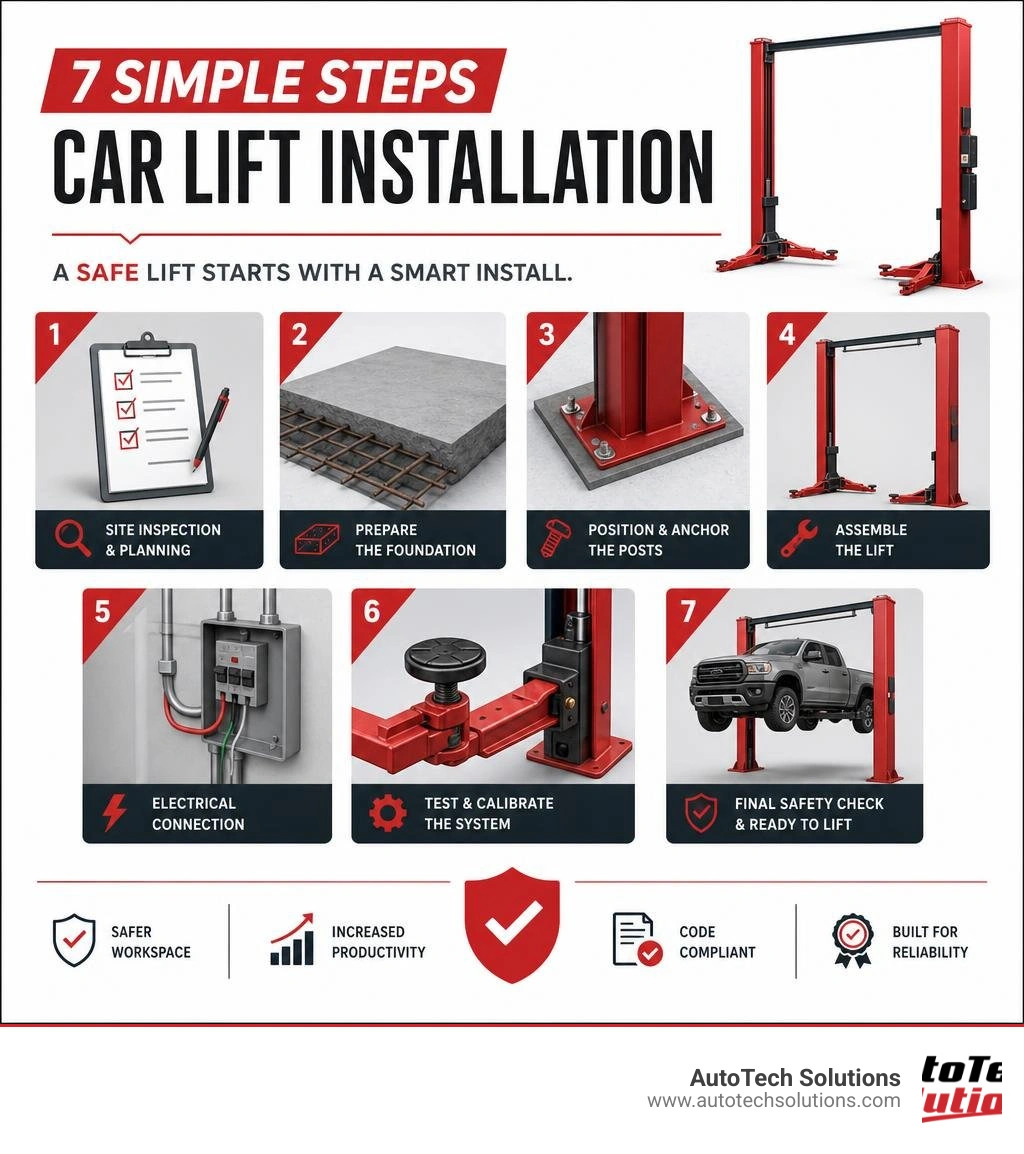
When we perform a commercial car lift installation, we follow a rigorous, standardized process that aligns with ANSI/ALI ALCTV safety standards. This systematic approach ensures that every anchor, bolt, and hydraulic fitting is installed with precision.

Below is the step-by-step process our professional technicians execute to bring your service bays online. For an in-depth reference on tooling and safety protocols, check out our Car Lift Installers Complete Guide.
Step 1: Site Prep for Car Lift Installation
The installation begins by mapping out the exact footprint of the lift within the service bay. We use a high-visibility chalk line to snap centerlines and reference markers on the shop floor. During this phase, we verify the bay clearance and perform an obstacle scan using specialized scanners to ensure we do not drill into embedded rebar, post-tension cables, or utility conduits. We also mark out the swing arcs of the lift arms to ensure they will not interfere with nearby workbenches, tool storage, or structural columns.
Step 2: Unpacking and Column Positioning
Next, we unpack the heavy-duty columns and inventory all components. Because commercial lift columns can weigh anywhere from 600 to over 1,000 lbs each, we use professional rigging and lifting equipment to position them safely. We stand the columns upright and align their baseplates precisely with our chalk lines. We then take diagonal measurements across the baseplates to ensure the columns are perfectly square within a 1/4-inch tolerance.
Step 3: Anchoring and Plumb Alignment
With the columns positioned, we drill the anchor holes using a heavy-duty rotary hammer drill. It is vital to drill the holes perfectly vertical and to a depth that is at least 1/4-inch deeper than the anchor bolt length to accommodate concrete dust settlement.
Once drilled, we vacuum and blow out the concrete dust three times; leaving dust in the hole can reduce anchor holding strength by up to 50%. We insert high-grade wedge anchors and use a precision level to verify that the columns are perfectly plumb on both the front-to-back and side-to-side axes. We insert metal shims under the baseplates as needed to achieve perfect vertical alignment before tightening the anchors using a calibrated torque wrench to the manufacturer's exact specification (typically 90 to 150 ft-lbs).
Step 4: Overhead Beam and Equalizer Cable Routing
Once the columns are anchored and plumbed, we install the overhead crossbeam. This beam houses the overhead shutoff bar and the limit switch, which cuts power to the motor if a tall vehicle contacts the safety bar.
With the overhead beam secured, we route the steel equalizer/synchronization cables. These cables ensure that both carriages raise and lower at the exact same speed, preventing vehicle tilt. We tension the cables and double-nut the threaded ends to prevent them from backing off under the vibration of daily shop operations.
Step 5: Power Unit Mounting and Hydraulic Plumbing
We mount the electro-hydraulic power unit to the designated main column. After securing the power unit, we run the hydraulic lines from the pump to the cylinders in both columns, securing the hoses cleanly along the overhead beam to prevent pinching or rubbing.
Next, we fill the hydraulic reservoir with high-grade AW-32 hydraulic fluid. Once the fluid is added, a licensed electrician completes the final electrical connections from the dedicated disconnect switch to the motor and safety limit switch.
Step 6: Arm and Restraint Assembly
With the structural and hydraulic systems in place, we install the lifting arms onto the carriage pins. We apply heavy-duty grease to the pins to ensure smooth rotation and quiet operation.
We then install and calibrate the arm restraint gears. These safety mechanisms lock the arms in place once the lift begins to rise, preventing the arms from shifting under the weight of a vehicle. We test the spring tension on the restraint pins to ensure they engage and disengage automatically as the carriage reaches the floor.
Step 7: Testing and Car Lift Installation Verification
The final, and most critical, step is safety testing. We never place a vehicle on a newly installed lift without first running multiple no-load cycles. These initial cycles allow us to bleed air from the hydraulic system, verify that the equalizer cables are properly tensioned, and confirm that the safety locks on both columns engage simultaneously.
We test the safety locks at five different height intervals. Once the lift passes all dry runs, we perform a controlled load test using a fleet vehicle, followed by a final check of the anchor bolt torque to ensure no settling occurred during the test.
Comparing Commercial Lift Types and Requirements
Selecting the right lift depends entirely on the types of vehicles your shop services and your workflow requirements. Below is a comparison table outlining the technical differences between the three most common commercial lift types:
| Specification | 2-Post Lifts | 4-Post Lifts | Scissor Lifts |
|---|---|---|---|
| Primary Use | General repair, wheel, and brake service | Wheel alignment, fleet storage, quick-lube | Detailing, quick-lube, light mechanical |
| Typical Capacity | 9,000 to 18,000 lbs | 9,000 to 60,000 lbs | 6,000 to 14,000 lbs |
| Concrete Depth | 4.0" to 6.5"+ (Strictly required) | 4.0" to 5.0" (Freestanding options exist) | 4.0" to 5.0" (Bolt-down or flush-mount) |
| Ceiling Height | 11.5 to 14+ feet | 8.0 to 10.0+ feet | 8.0 to 10.0 feet |
| Electrical Supply | 208-230V / 30 Amp | 110V (Light duty) or 220V / 20 Amp | 110V or 220V / 20 Amp |
If you are planning to upgrade your service bays with high-capacity two-post systems, we recommend reading our Car Lift 2 Post Buyers Guide 2026 to find the ideal match for your facility's operational demands.
Common Installation Pitfalls to Avoid
In our years of servicing commercial shops across Michigan and the Carolinas, we have seen how minor installation mistakes can lead to major operational headaches, equipment damage, or safety hazards. Here are the most common pitfalls we encounter and how to avoid them:
- Anchoring Over Control Joints: Never drill or set lift anchors within 6 inches of a concrete expansion seam, control joint, or structural crack. Doing so severely compromises the holding power of the anchor and can cause the concrete to fracture under load.
- Improper Anchor Torque: Using an impact wrench to tighten concrete anchors is a critical error. Impact guns can easily over-torque and shear the anchor bolts, or under-torque them, leaving the column unstable. Always use a calibrated manual torque wrench.
- Unplumb Columns: If the columns are not perfectly vertical, the carriages will bind as they travel up the tracks. This causes premature wear on the slide blocks, strains the hydraulic motor, and can cause the lift to operate unevenly.
- Skipping the No-Load Bleeding Cycle: Failing to bleed the air out of the hydraulic cylinders before lifting a vehicle can result in jerky, uneven lifting or a sudden drop when the safety locks are disengaged.
- Electrical Code Violations: Running power lines across the floor or using temporary extension cords to power a commercial lift is a major safety violation. Power must be routed cleanly through overhead conduits directly to a dedicated wall-mounted disconnect switch.
To keep your equipment running smoothly long after the initial setup, establish a strict preventative maintenance schedule. Learn more about protecting your investment by reviewing our guide on Car Lift Maintenance, which outlines industry-standard 2-post installation procedures and daily inspection checklists.
Frequently Asked Questions about Commercial Lifts
What are the minimum concrete requirements for a commercial lift?
For standard commercial lifts up to 10,000 lbs, you need a minimum of 4 inches of 3,000 PSI concrete cured for at least 28 days. For heavy-duty fleet lifts over 12,000 lbs, a thickness of 6.5 to 8 inches of 3,500 to 4,000 PSI concrete is required.
Why is ALI certification critical for shop safety?
The Automotive Lift Institute (ALI) certification ensures that the lift has been third-party tested and complies with rigorous national safety standards. Many commercial insurance policies and local building codes require ALI-certified lifts and annual inspections to maintain coverage and compliance.
Should commercial shops attempt self-installation?
No. Commercial lift installation involves complex rigging, high-torque anchoring, hydraulic plumbing, and high-voltage electrical integration. Professional installation by certified technicians ensures safety, guarantees compliance with local building codes, and protects your manufacturer's warranty.
Conclusion
A safe, efficient service bay starts with a flawless car lift installation. At AutoTech Solutions, we are dedicated to helping commercial shops, fleet operations, and collision centers maximize their productivity and minimize downtime. From equipment sales and precision installation to certified inspections and rapid repair response, our factory-trained technicians serve shops across Michigan, North Carolina, and South Carolina.
Ready to upgrade your facility or install a new commercial lift system? Contact the experts at AutoTech Solutions today to schedule your site assessment and professional setup.
Learn more about our turnkey services by visiting the AutoTech Solutions Facility Buildouts and Installations page.