Replace Leaking Hydraulic Cylinder Seals Before Lift Downtime Grows
For a successful hydraulic cylinder seal replacement, take the lift out of service, lock out its power, relieve all hydraulic pressure, and support the load before disconnecting any lines. Then remove the cylinder using approved lifting methods, install the exact seal kit for that cylinder, inspect the rod and bore for scoring, reassemble to the manufacturer's torque specification, bleed air, and test for leaks at low pressure before returning the lift to full service.
A small leak at the rod gland is not just a housekeeping problem. It can lead to pressure loss, slow lift movement, cylinder drift, contaminated work areas, and unexpected bay downtime. In commercial automotive shops, worn seals should be addressed early - before fluid loss or internal bypass turns a planned maintenance task into a larger cylinder rebuild.
New seals alone will not fix a damaged rod, contaminated oil, or incorrect seal orientation. Clean work practices, compatible hydraulic fluid, correct tools, and a careful post-repair test are what make the repair last.
AutoTech Solutions Staff helps commercial automotive facilities keep hydraulic lift equipment safe, productive, and ready for service.

Warning Signs of Damaged Commercial Hydraulic Seals
Commercial automotive lifts, heavy-duty frame machines, and shop presses operate under intense mechanical stress. Over time, dynamic cycling breaks down the elastomeric integrity of internal packings. Recognizing failure indicators early enables your team to execute structured corrective maintenance protocols before a minor weep escalates into total hydraulic collapse.
External fluid leakage is the most obvious red flag. When oil bypasses the rod wiper and pools on the floor plate or around the cylinder base, the primary dynamic rod seal has degraded. Beyond the obvious slip hazard, escaping fluid starves the pump and introduces airborne particulates into the fluid stream.
Internal bypass is more insidious. If a two-post or four-post lift begins to drift downward under nominal load without any visible external leak, fluid is bypassing the piston seal assembly inside the barrel. High-pressure oil slips from the extension chamber into the retraction chamber, eroding lifting capacity and causing uneven arm elevation.
Physical rod damage often accompanies seal wear. Look closely for micro-grooves, pitting, or chrome flaking on the extended rod surface. Running new seals across a scored chrome rod will ruin the sealing lip in just a few cycles. Thermal degradation also hardens elastomeric packings—turning supple polyurethane into brittle plastic that cracks under standard operating pressure.
| Seal Failure Symptom | Probable Root Cause | Corrective Maintenance Action |
|---|---|---|
| External oil pooling at cylinder gland | Dynamic rod seal wear or damaged wiper | Disassemble gland, inspect chrome rod, and install fresh rod seal packings. |
| Cylinder drift under full load | Piston seal bypass or barrel bore swelling | Extract piston assembly, hone barrel if within tolerance, and replace piston seals. |
| Sluggish or jerky carriage movement | Air entrapment or particulate contamination | Bleed air from hydraulic circuit; flush fluid to meet ISO 4406 cleanliness standards. |
| Deep longitudinal rod scoring | Environmental grit entering past failed wiper | Polish rod imperfections with fine abrasive cloth; replace rod wiper and guide bushings. |
| Hardened, cracked elastomeric seals | Fluid overheating or chemical incompatibility | Replace entire seal kit with high-durometer compounds; flush and refill system oil. |
Essential Tooling and Workspace Preparation
Treat hydraulic teardowns with the same precision as engine rebuilds. A single grain of shop grit trapped inside an actuator can destroy sealing lips and gouge precision-machined barrels. Before starting, review the comprehensive field guide for seal replacement and rod inspection to ensure all workshop protocols align with standard practices.
Safety comes first. Adhere strictly to OSHA 29 CFR 1910.147 standards by implementing complete Lockout/Tagout (LOTO) on the lift's electrical disconnect box. Fully lower the carriage to its mechanical safety locks, vent stored hydrostatic energy through the manual lowering valve, and confirm zero-energy status with pressure gauges before cracking open any hydraulic lines.

Equip your rebuild bench with dedicated service tools:
- Adjustable pin spanner wrench (sized precisely for cylinder gland face pins)
- Calibrated torque wrenches (spanning 50 to 500 Nm ranges)
- Brass, bronze, or nylon seal extraction picks (never use carbon steel picks or screwdrivers)
- Dial caliper and inside/outside micrometers
- Piston seal installation cones and resizing sleeves
- Lint-free industrial shop wipes (standard paper towels shed fibers that clog valves)
- Clean catch basins, fluid collection tanks, and approved solvent degreasers
Workspace Prep for Hydraulic Cylinder Seal Replacement
Isolate the tear-down area from grinding dust, bay traffic, and overhead door drafts. Secure the removed cylinder assembly in a heavy-duty workbench vise fitted with soft aluminum or polyurethane jaws to prevent barrel deformation. Drain residual hydraulic oil into a clean pan to evaluate system health—milky fluid indicates moisture contamination, while dark, burnt-smelling fluid indicates thermal breakdown.
Maintain target fluid cleanliness levels around ISO 4406 18/16/13 during the rebuild. Thoroughly spray the exterior of the cylinder with industrial degreaser before opening the internal chambers.
Material Selection and Seal Kit Sourcing
Always match replacement components to OEM specifications. Modern commercial lifts rely on multi-stage seal geometry:
- Polyurethane (PU) U-Cups: Serve as the primary dynamic seal, delivering exceptional abrasion and extrusion resistance under cyclic pressures up to 3,000 PSI.
- Nitrile Butadiene Rubber (NBR) O-Rings: Standard static seals used on head gland outer diameters and piston retention threads; reliable across broad temperature ranges.
- PTFE (Teflon) Buffer Seals: Positioned ahead of the primary rod seal to absorb extreme pressure spikes and reduce dynamic friction.
- Thermoplastic Anti-Extrusion Backup Rings: Positioned adjacent to O-rings and U-cups to prevent elastomer migration into the mechanical clearance gap under heavy loading.
- Rod Wipers (Excluders): Metal-cased or snap-in polyurethane scrapers designed to clear abrasive bay dust from the rod before it enters the internal gland.
Step-by-Step Hydraulic Cylinder Seal Replacement for Commercial Lifts
Executing this service methodically ensures that your commercial lifts return to zero-drift, factory-spec operation.

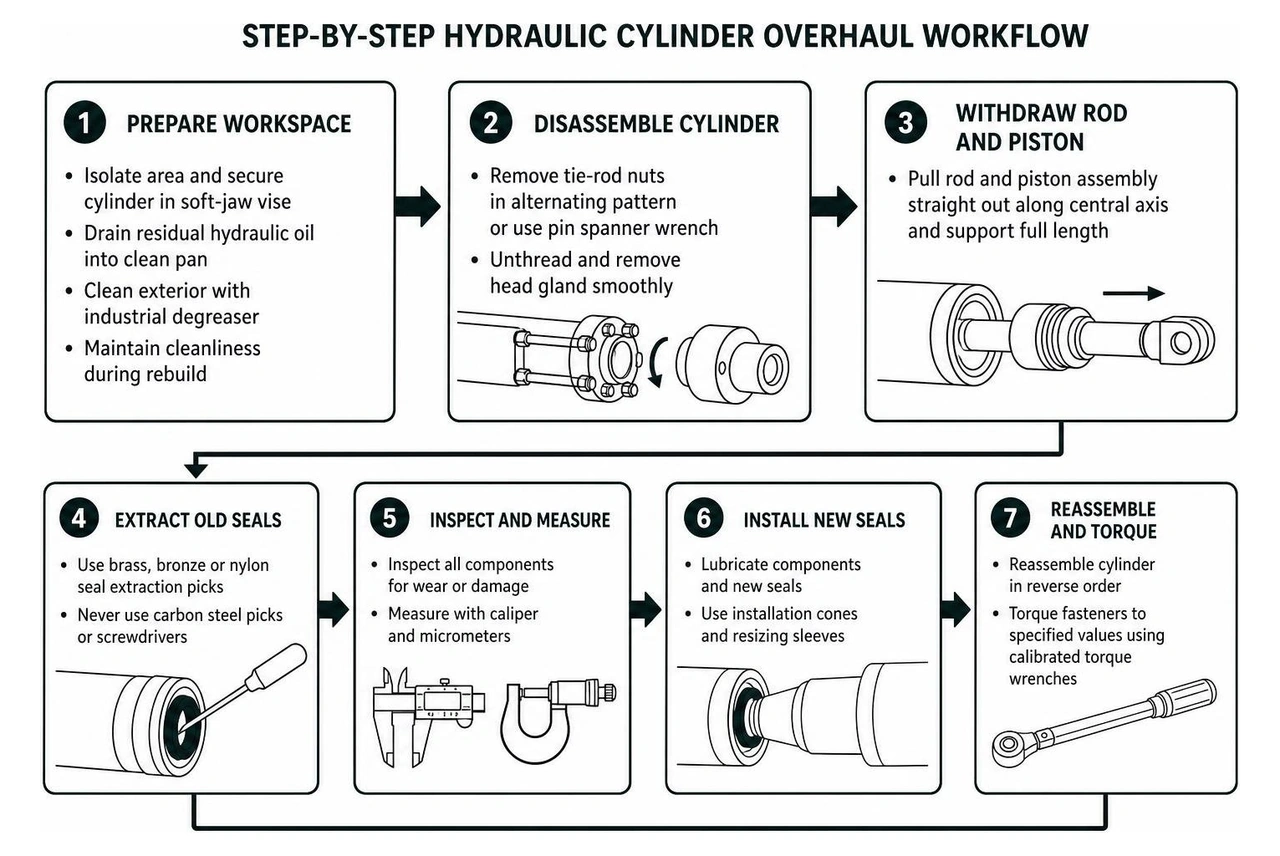
Disassembling the Cylinder and Extracting Old Packings
- Secure the Cylinder: Mount the barrel horizontally in the soft-jaw vise, clamping near the base end cap where the metal is strongest to avoid pinching the cylinder bore.
- Remove the Head Gland: On tie-rod cylinders, loosen the tie-rod nuts in an alternating diagonal pattern using a heavy-duty socket. For welded or threaded-gland cylinders, engage an adjustable pin spanner wrench into the gland face holes. Unthread the gland smoothly, avoiding impact guns that can shear internal locating shoulders.
- Withdraw the Rod and Piston: Pull the chrome rod straight out along its central axis. Support the assembly along its entire length to avoid binding or scoring the internal cylinder bore.
- Disassemble the Piston: Secure the rod eye, remove the piston retaining nut or set screw, and slide the piston head off the rod.
- Extract Worn Seals: Use brass picks to hook under old dynamic U-cups, buffer rings, and wear bands. Work carefully inside the gland bore to protect the internal machined grooves from gouges. Wrap electrical tape over the rod threads to prevent the sharp edges from slicing new seals during transit.
- Bore and Component Inspection: Wash all steel components in clean solvent. Inspect the inner barrel bore with an inspection bore light; any longitudinal grooving deeper than fingernail depth requires honing or barrel replacement. Check rod runout with a dial indicator—maximum acceptable straightness deviation is ≤0.05 mm per 100 mm of length.
Seating the New Packings During Hydraulic Cylinder Seal Replacement
Before seating new seals, lubricate every component with fresh, clean ISO AW-32 or AW-46 hydraulic oil. Never install elastomeric packings dry.
For internal gland grooves, employ the "kidney bean" fold technique. Gently collapse the polyurethane rod seal inward so it resembles a kidney bean, slide it past the outer gland lips, and release it directly into its designated internal groove. Verify that the sealing lip faces the pressurized fluid chamber.
PTFE piston rings require deliberate handling. Expand the PTFE band gently using a tapered installation cone to slide it over the piston lands. Because PTFE exhibits plastic memory, compress the expanded ring back to its working diameter using a dedicated resizing collar before attempting barrel insertion. For in-depth mechanical nuances, consult this professional guide on repacking hydraulic cylinders to ensure reliable component fitment.
Install dynamic wear bands and external wiper scrapers last. Double-check that all anti-extrusion backup rings sit on the low-pressure side of their mating primary elastomeric seals.
Reassembly, Torque Specifications, and Validation Testing
Carefully coat the cylinder barrel bore and piston assembly with clean hydraulic fluid. Align the piston squarely with the barrel mouth and ease the assembly into the cylinder. A piston ring compressor sleeve prevents seal clipping during this step.
Slide the head gland into the barrel mouth. For threaded glands, torque the component to OEM specifications (a standard 50 mm / 2-inch rod gland typically requires approximately 250 Nm / 184 ft-lb). For tie-rod cylinders, torque the tie-rod nuts in three progressive passes using a cross-star pattern:
- Pass 1: 30% of target torque
- Pass 2: 70% of target torque
- Pass 3: 100% final torque rating (e.g., 110 N·m for standard 80 mm bore tie-rod fasteners)
Once reassembled and remounted onto the lift structure, hook up the hydraulic feed lines and begin the bleeding and validation procedure.
- Air Bleeding: Open the cylinder air bleed screw at the high point of the hydraulic circuit. Cycle the power unit at low pressure until clear, bubble-free hydraulic oil discharges into your catch container, then close the bleeder valve securely.
- Low-Pressure Cycling: Run the unloaded lift carriage through 5 complete extension and retraction strokes at roughly 200–300 PSI to verify mechanical alignment and seat the dynamic seals.
- High-Pressure Drift Testing: Elevate a commercial test load to mid-stroke, isolate the hydraulic pump, and set up a dial indicator against the cylinder rod. Hold system pressure (typically 2,500–3,000 PSI) for 15 minutes. Total rod drift must not exceed 0.5 mm over this duration, and the rod gland must show zero weeping.
Document this rebuild in your shop records, aligning with established preventative maintenance service schedules to maintain equipment safety and compliance.
Frequently Asked Questions About Hydraulic Cylinder Seal Maintenance
How often should commercial hydraulic cylinder seals be replaced?
In high-volume commercial automotive bays, dynamic hydraulic seals generally deliver a service life of 5,000 operating hours or roughly 2 to 3 years of daily lifting cycles. However, extreme operating environments containing airborne particulate dust, heavy temperature swings, or moisture contamination can accelerate wear. We recommend integrating seal integrity checks into your annual lift safety inspections. Combining routine fluid testing with systematic preventive and curative maintenance strategies lets you swap packings during planned maintenance windows rather than dealing with unexpected bay downtime.
Can damaged cylinder rods be polished or must they be replaced?
Minor surface imperfections, light oxidation, and superficial scratches that do not catch a fingernail can be polished directly on the bench. Use a 400-to-600-grit emery cloth with fine industrial lubricant, polishing circumferentially around the rod rather than lengthwise to maintain correct surface profile. If the rod exhibits deep longitudinal scoring, peeling hard chrome plating, or a bend exceeding 0.5 mm per meter of stroke, you must replace the rod. Operating damaged rods will ruin fresh seal lips within days. Adhering to professional automotive equipment repair standards ensures that repaired lifting mechanisms maintain original safety tolerances under heavy commercial loads.
Why do newly installed cylinder seals fail prematurely?
Immediate seal failure after a rebuild usually traces back to four installation errors:
- Incorrect Orientation: Installing a directional U-cup backward prevents fluid pressure from expanding the sealing lip, resulting in instant low-pressure fluid bypass.
- Thread Shearing: Sliding new seals over uncovered rod threads or sharp gland step shoulders can cut micro-slices into the elastomeric lip during assembly.
- Contamination Ingestion: Tiny metal shavings or airborne grit trapped in the sealing groove act like grinding compounds against dynamic surfaces.
- The Dieseling Effect: If trapped air is not properly bled from the cylinder, rapid pressurization can superheat air bubbles, scorching and eroding nearby elastomeric seals.
Similar hydraulic principles apply across other shop infrastructure components; reviewing our hydraulic motor repair insights offers valuable context on how contamination and aeration degrade pressurized fluid power systems.
Conclusion
A leaking hydraulic cylinder compromises the safety, efficiency, and revenue potential of any commercial automotive service facility. Addressing worn packings through proactive seal replacement restores full lifting power, prevents expensive cylinder barrel damage, and protects technicians from fluid hazards and unexpected equipment drops.
Maintaining modern commercial shop equipment requires dedicated tooling, clean rebuild conditions, and strict adherence to mechanical tolerances. When internal scoring, barrel ovality, or time constraints demand experienced field support, partnering with certified equipment specialists keeps your operation running safely.
AutoTech Solutions provides turnkey automotive equipment sales, professional car lift installation, scheduled preventative maintenance, and rapid emergency repair across light, heavy-duty, and collision repair shops throughout Michigan and the Carolinas. With regional service centers in Charlotte, NC, Raleigh, NC, Wade, NC, and Novi, MI, our certified technicians minimize bay downtime so your team can maintain maximum shop productivity.
Contact AutoTech Solutions today to schedule your comprehensive professional hydraulic lift cylinder repair or establish an equipment maintenance plan for your facility.