Understanding ADAS Equipment Installation and Setup

ADAS equipment installation and setup is the process of configuring specialized calibration tools, diagnostic scanners, and alignment systems in a controlled environment to ensure vehicle safety sensors function accurately. Here's what you need to know:
Quick Setup Overview:
- Space Requirements - Minimum 40×40 feet with level floors (±10mm tolerance)
- Essential Equipment - Calibration frames, diagnostic scanners, target systems, laser leveling tools
- Environmental Controls - Diffused LED lighting, non-reflective surfaces, temperature control
- Calibration Methods - Static (controlled environment) and dynamic (on-road testing)
- Power & Connectivity - Stable electrical supply, high-speed internet for OEM updates
If you manage an automotive service or collision facility, you've probably noticed the surge in ADAS-equipped vehicles coming through your doors. These advanced safety systems—from lane-keeping assist to automatic emergency braking—rely on precise sensor calibration to function correctly. According to the NHTSA, these technologies are critical for reducing traffic accidents and improving overall road safety.
The challenge? Approximately 80% of collision repair facilities don't have adequate space for proper ADAS calibrations. Even minor repairs like windshield replacements or fender benders can knock sensors out of alignment, requiring recalibration before the vehicle is safe to return to the road.
Setting up ADAS calibration capabilities isn't just about buying equipment. It requires careful facility planning, from floor levelness within 10mm to controlled lighting that won't confuse camera sensors. You'll need to consider everything from wall coatings to internet connectivity for downloading the latest OEM procedures.
The good news? With the right setup, ADAS calibration services can reduce your cycle times, increase revenue, and position your facility as a leader in advanced automotive care. This guide walks you through every requirement—from selecting calibration frames to programming diagnostic scanners—so you can launch or optimize your ADAS services with confidence.
 Facility preparation with space and lighting requirements, 2) Equipment selection including frames and scanners, 3) Installation of calibration targets and laser systems, 4) Programming and OEM compliance verification, 5) Testing and validation reporting - adas equipment installation and setup infographic")
Essential ADAS Equipment Installation and Setup Requirements
To transform your shop into a precision-focused calibration center, you need more than just a standard toolbox. The adas equipment installation and setup process begins with acquiring a suite of specialized hardware and software designed to communicate with a vehicle’s onboard computers.
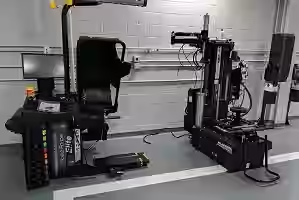
At AutoTech Solutions, we specialize in providing the core components required for high-volume shops. The foundation of any setup is the calibration frame. Think of this as the "skeleton" that holds your targets. These frames must be robust and adjustable to accommodate everything from a compact sedan to a heavy-duty truck.
Beyond the frame, you will need:
- Diagnostic Scanners: High-end tablets that interface with the vehicle's OBD-II port to initiate the calibration software.
- Target Systems: These include patterned boards for cameras, radar reflectors for Forward Collision Warning (FCW), and Doppler simulators for blind-spot monitoring.
- Laser Leveling and Distance Measurers: Precision is measured in millimeters here. Bluetooth-enabled distance measurers are becoming the industry standard to ensure the frame is perfectly squared to the vehicle's thrust line.
- Wheel Alignment Systems: Many ADAS procedures cannot begin until you've verified the vehicle's mechanical alignment.
For shops in Michigan or the Carolinas looking to integrate these tools, our Services: Collision Center Solutions provide the technical backbone needed to ensure every piece of equipment is installed to OEM standards.

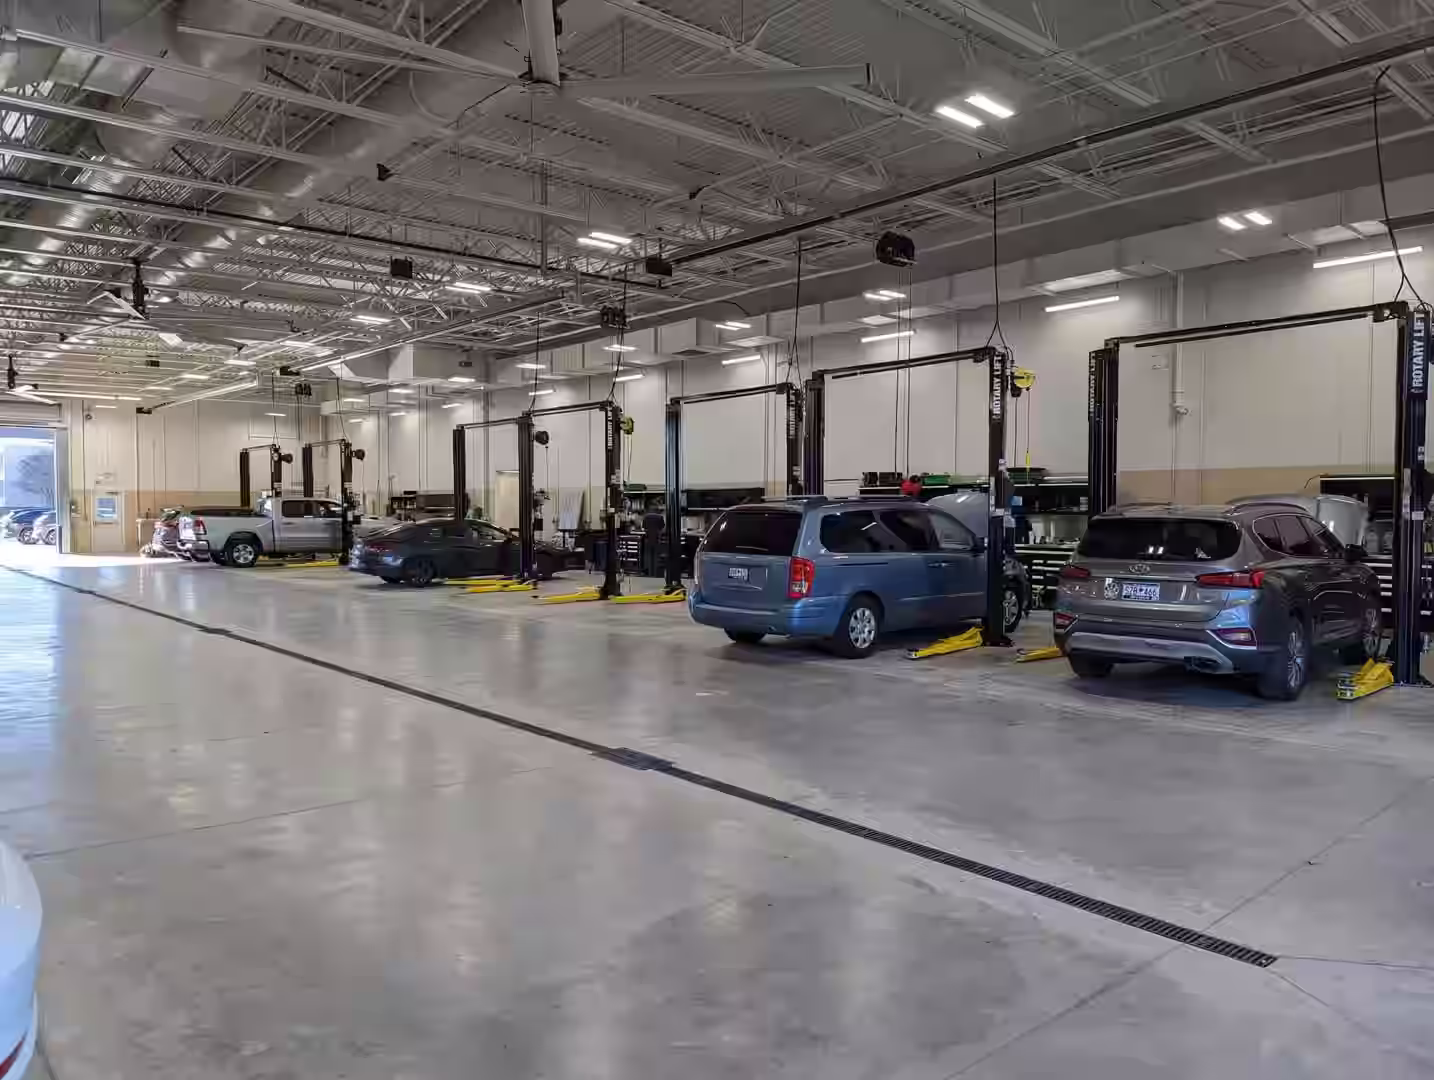
Space and Flooring Standards for ADAS Equipment Installation and Setup
One of the most common hurdles we see is the "space race." While a standard service bay might suffice for an oil change, ADAS calibration is a different beast entirely.
The 40x40 Rule: While some specific procedures can be done in smaller areas, a minimum area of 40×40 feet is widely recommended. This allows for the "field of vision" required by front-facing cameras and the side-clearance needed for around-view monitor (AVM) calibrations.
Flooring is Non-Negotiable: If your floor has a "slope for the drain," you might have a problem. ADAS sensors are incredibly sensitive to pitch and roll.
- Tolerance: Floors must be level within +/- 10mm.
- Surface Quality: We recommend low-gloss, non-reflective surfaces like polished concrete, epoxy resin, or high-quality vinyl.
- Obstructions: The area must be free of toolboxes, metal posts, or other vehicles that could cause "radar clutter" or visual interference.
Environmental Controls and Lighting for ADAS Equipment Installation and Setup
If the space is the body, the environment is the soul of a successful adas equipment installation and setup. Cameras are the "eyes" of the vehicle, and like human eyes, they don't like glare or pitch-black rooms.
- Lighting: You need uniform, diffused LED lighting. Avoid direct sunlight or "spotlight" effects that create harsh shadows on calibration targets. Many shops utilize light meters to ensure consistent brightness across the entire bay.
- Wall Coatings: Believe it or not, the color of your walls matters. We suggest light-colored, low-gloss paint. This prevents "ghosting" or reflections that can trick a camera into thinking a target is in a different position.
- Sunlight Minimization: Windows should be fitted with light-blocking curtains or shades. A sudden beam of sunlight hitting a radar reflector can cause a calibration failure.
- Climate and Connectivity: Temperature and humidity should be controlled to prevent equipment expansion or contraction. Furthermore, high-speed internet is essential; modern systems like the Autel MaxiSys or John Bean EZ-ADAS require constant updates to access the latest OEM cloud data.
Static vs. Dynamic Calibration Methods
When we talk about "calibrating," we are actually talking about two distinct methods. Depending on the vehicle manufacturer, you may need to perform one or both.
Static CalibrationThis happens inside your shop. It involves the vehicle being stationary while facing specific targets (like "checkerboards" or "dots"). This method relies heavily on your facility's environment—the level floor and controlled lighting mentioned earlier. It is highly precise and allows for a controlled validation of the sensor’s "zero point."
Dynamic CalibrationThis is the "road test" version. The vehicle is driven on a relatively straight road with clear markings at a specific speed (often between 25 and 60 mph) for a set amount of time. The onboard computer "learns" its environment by watching lane lines and other cars.
The Comparison:
| Feature | Static Calibration | Dynamic Calibration |
|---|---|---|
| Environment | Controlled Indoor Bay | Public Roads / Real-world |
| Tools Required | Frames, Targets, Lasers | Diagnostic Scanner |
| Time | 30 - 90 Minutes | 15 - 45 Minutes (Weather dependent) |
| Main Challenge | Space and Floor Levelness | Weather, Traffic, Road Markings |
Whether you are performing a static setup or preparing for a road test, our Services: Service, Repair and Equipment Support team can help troubleshoot the software hurdles that often arise during these complex handshakes between tool and car.
Step-by-Step ADAS Tool Alignment and Programming
Once your facility is ready and your equipment is unboxed, the actual adas equipment installation and setup of the tools follows a rigorous, step-by-step logic.
- Vehicle Pre-Check: Before touching a target, verify the vehicle is at the correct "ride height," has a full tank of gas (or equivalent weight), and has correct tire pressure.
- Centerline Setup: We use laser leveling tools to find the vehicle's geometric centerline. This is the "North Star" for the rest of the alignment.
- Wheel Toe and Thrust Angle Check: Using a system like the John Bean V3400, we ensure the rear wheels are pushing the car straight. If the thrust angle is off, the ADAS sensors will be looking in the wrong direction even if the targets are "perfect."
- Frame Positioning: The calibration frame is placed at a specific distance from the front bumper or wheel hubs (measured via Bluetooth or laser).
- Target Leveling: The targets are adjusted for height and tilt to match the sensor’s specific mounting point on the vehicle.
- Software Initiation: The technician connects the diagnostic scanner, selects the vehicle make/model, and follows the on-screen prompts to "start" the calibration.
- Validation and Reporting: Once the system says "Success," you must generate a validation report. This is your proof of OEM compliance and is vital for insurance documentation.
If you are looking for the right hardware to start this process, check out our insights on Post: Auto Collision Repair Tools.
Frequently Asked Questions about ADAS Setup
When is ADAS recalibration required?
It is a common misconception that you only need calibration after a major wreck. In reality, recalibration is required after:
- Windshield Replacement: Front-facing cameras are usually mounted to the glass.
- Bumper or Grille Repair: This is where most radar sensors live.
- Suspension Work or Wheel Alignment: Changing the "stance" of the car changes where the sensors are pointing.
- Sensor Replacement: Any time a camera, radar, or ultrasonic sensor is swapped out.
- Airbag Deployment: This often triggers a need to recalibrate the steering angle sensor.
What are the costs and ROI of in-house ADAS setup?
While the initial investment in adas equipment installation and setup can range from $20,000 to $50,000+ depending on the systems chosen (like Autel, John Bean, or TEXA), the ROI is often rapid.
- Cycle Time: You no longer have to wait 3 days for a dealership to fit you in.
- Revenue: Instead of subbing out a $300-$600 service, you keep that profit in-house.
- Liability: You have full control over the validation reports, ensuring the job was done to OEM specs.Financing options are widely available to help shops manage the initial "sticker shock" of the equipment.
What training is needed for ADAS technicians?
You can't just hand a scanner to a rookie and hope for the best. Technicians need:
- Hands-on Certification: Understanding how to physically move the frames and targets. Organizations like I-CAR provide industry-standard training for these complex procedures.
- Software Literacy: Navigating complex diagnostic menus and cloud updates.
- OEM Awareness: Every manufacturer (Toyota, Ford, BMW) has different tolerances.
- Continuous Learning: ADAS tech changes every six months. We recommend regular training refreshers to stay current with Lidar and 360-degree camera innovations.
Conclusion
The automotive landscape is shifting under our feet. What was once "luxury" technology is now standard on the most basic economy cars. For shops in Raleigh, Charlotte, or Novi, investing in adas equipment installation and setup isn't just a way to make more money—it's a way to future-proof your business.
At AutoTech Solutions, we don't just sell you a box and wish you luck. We provide a "one-stop-shop" experience, from the initial facility buildout to the long-term maintenance of your alignment racks and scanners. We know that in collision repair, downtime is the enemy. That’s why our expert support spans from Michigan down to the Carolinas, ensuring your shop stays at the cutting edge of safety and precision.
Ready to take the next step? Explore our Services: Installations, Upfits & Facility Buildouts to see how we can help you design a calibration center that meets the highest industry standards. Don't let your shop get left behind—let's get calibrated.