When Your Shop's Air Compressor Motor Fails, Every Minute Costs You Money
Air compressor motor repair is one of the most disruptive equipment challenges a commercial automotive shop can face. When the motor goes down, air tools stop, professional car lifts and pneumatic infrastructure are disabled, and your technicians are standing idle instead of generating revenue.
Quick answer: The most common air compressor motor problems and fixes
| Problem | Likely Cause | First Action |
|---|---|---|
| Motor won't start | Failed start capacitor, low voltage, tripped overload | Reset overload, test capacitor, check voltage |
| Motor trips breaker | Faulty unloader valve, shorted windings, undersized breaker | Inspect unloader valve, test windings with megohmmeter |
| Motor overheats | Clogged filter, low oil, poor ventilation | Clean intake filter, check oil, clear airflow path |
| Motor hums but won't turn | Bad start capacitor or centrifugal switch | Test and replace start capacitor |
| Unusual grinding or knocking | Worn bearings, mechanical binding | Inspect bearings, check for pump seizure |
The hard truth is that most shop managers don't think about the compressor motor until it's already failed. As one industry analysis put it, 62% of unplanned downtime for air compressor units is caused by structural mismatches or preventable component failures. For a busy service department, that kind of surprise can mean thousands of dollars in lost labor hours and emergency repair fees — not counting the cost of renting a temporary unit that rarely matches your system's capacity.
This guide walks through how to diagnose, repair, or replace a commercial air compressor motor — so you can make smart, fast decisions when it matters most.
Relevant articles related to air compressor motor repair:
Troubleshooting Commercial Air Compressor Motor Repair Issues
When a heavy-duty stationary compressor stops working, it is easy to assume the motor is completely dead and needs to be replaced. However, jumping to conclusions can cost your shop thousands of dollars in unnecessary capital expenditures. Systematically testing the system ensures you do not replace a perfectly good motor when the actual culprit is a simple electrical fault or a failing control component.
In commercial service bays from Novi, Michigan, down to Charlotte, North Carolina, electrical issues are frequently misdiagnosed as mechanical motor failures. One of the most common hidden culprits is voltage drop. When a commercial motor experiences a voltage drop of just 10%, a Permanent Split Capacitor (PSC) motor's starting ability is reduced by a staggering 19%. This leads to hard starts, excessive heat, and eventual motor winding failure.
To keep your shop running efficiently, you must establish a clear diagnostic workflow. For a deeper look at keeping your shop’s pneumatic systems in top shape, check out our guide on Air Compressor Repair and Maintenance for Automotive Shops.
Identifying Common Signs of Motor Failure
Catching motor degradation before it leads to a catastrophic shutdown is the key to minimizing emergency downtime. Keep an eye out for these common warning signs:
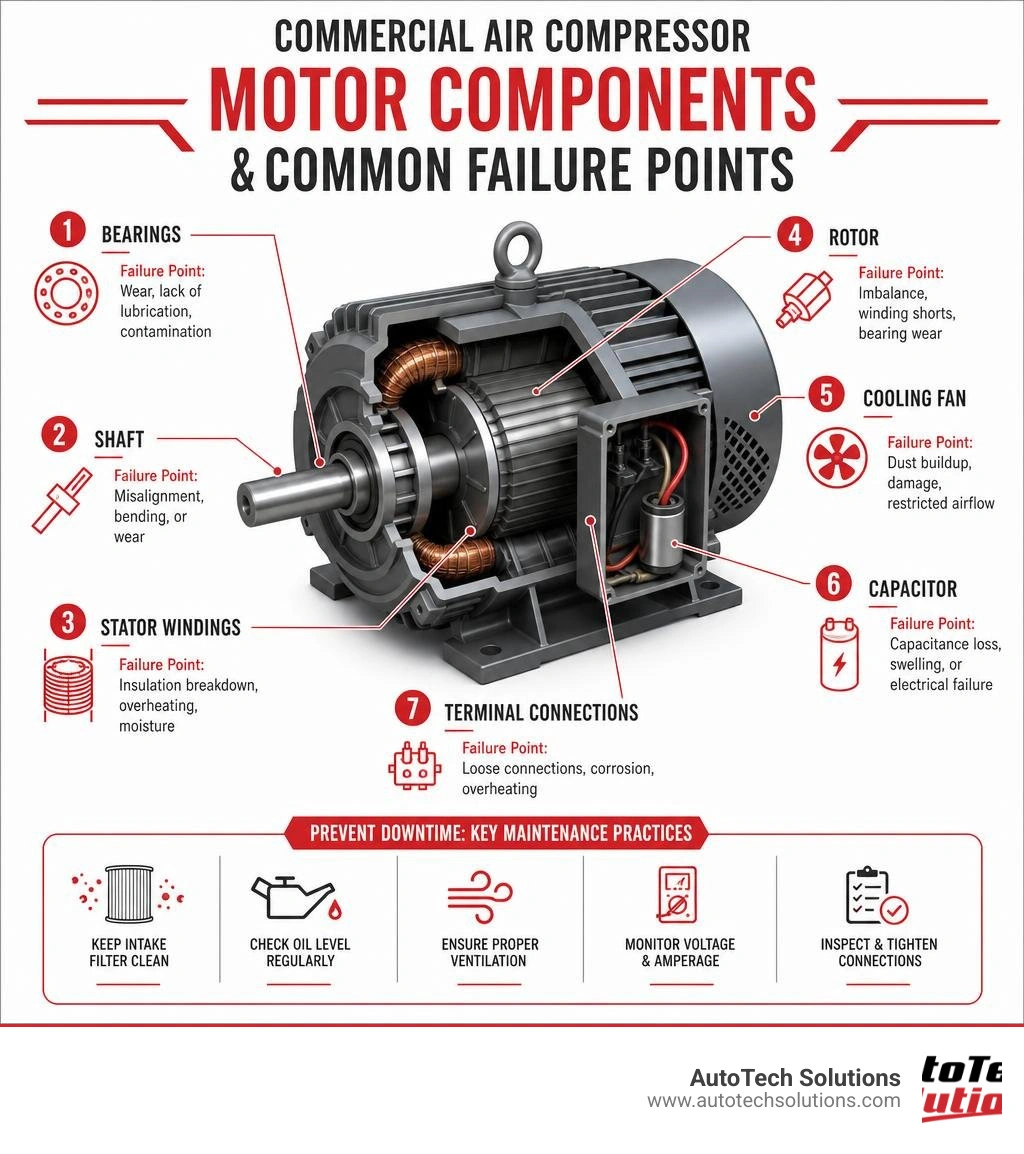
- Excessive Overheating: If the motor housing is too hot to touch or you smell burning insulation, the motor is drawing too much current or lacks proper ventilation. Class F insulation can withstand temperatures up to 155°C, while Class H can handle up to 185°C. Exceeding these thresholds will rapidly degrade the stator windings.
- Unusual Noises: Grinding, squealing, or heavy vibration usually points to bearing wear. If you hear a loud humming sound but the motor fails to spin, the start capacitor or the centrifugal start switch has likely failed.
- Hard Starting and Frequent Cycling: If the motor struggles to get up to speed or cycles on and off rapidly, it is working against extreme mechanical resistance or experiencing severe voltage drop.
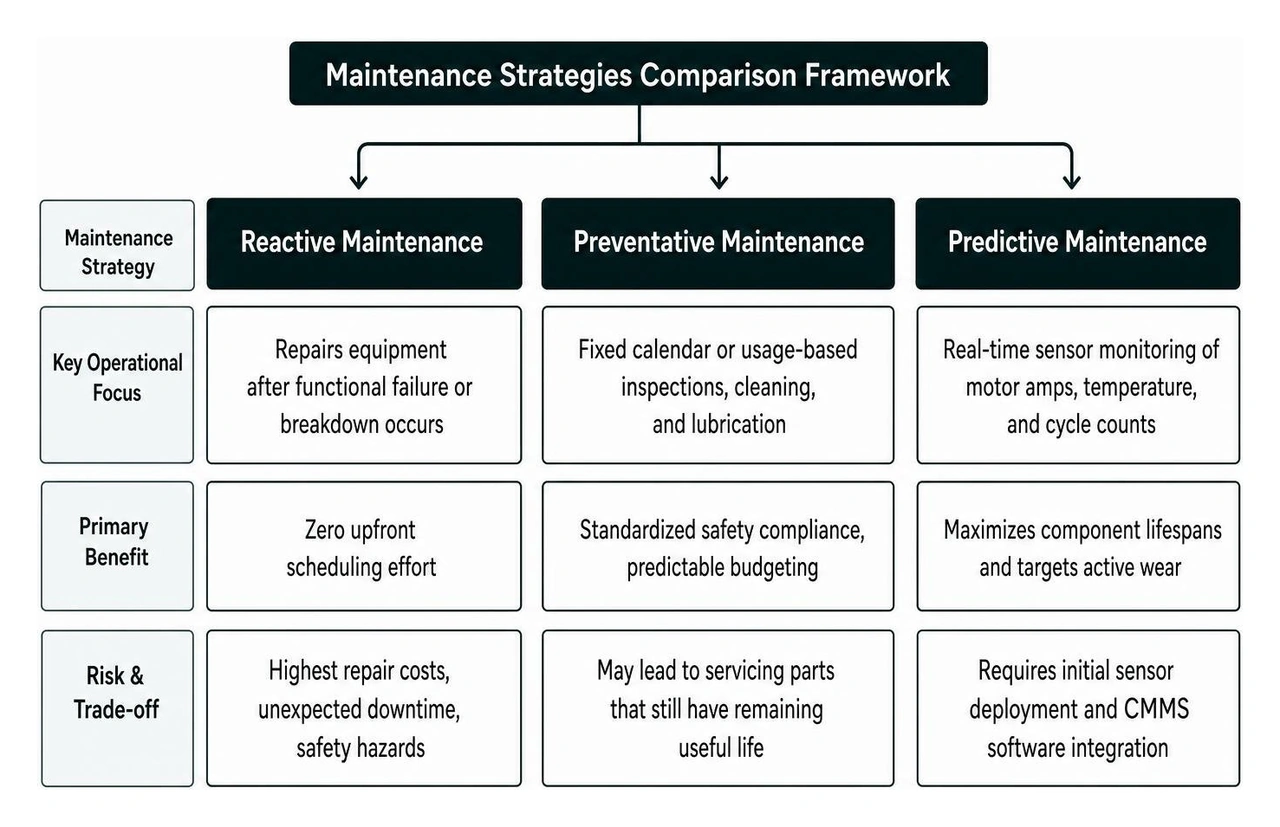
To prevent these issues from catching your shop by surprise, we highly recommend reviewing our Air Compressor Preventative Maintenance Guide to set up a bi-annual service schedule.
Diagnosing Electrical vs. Mechanical Faults in Air Compressor Motor Repair
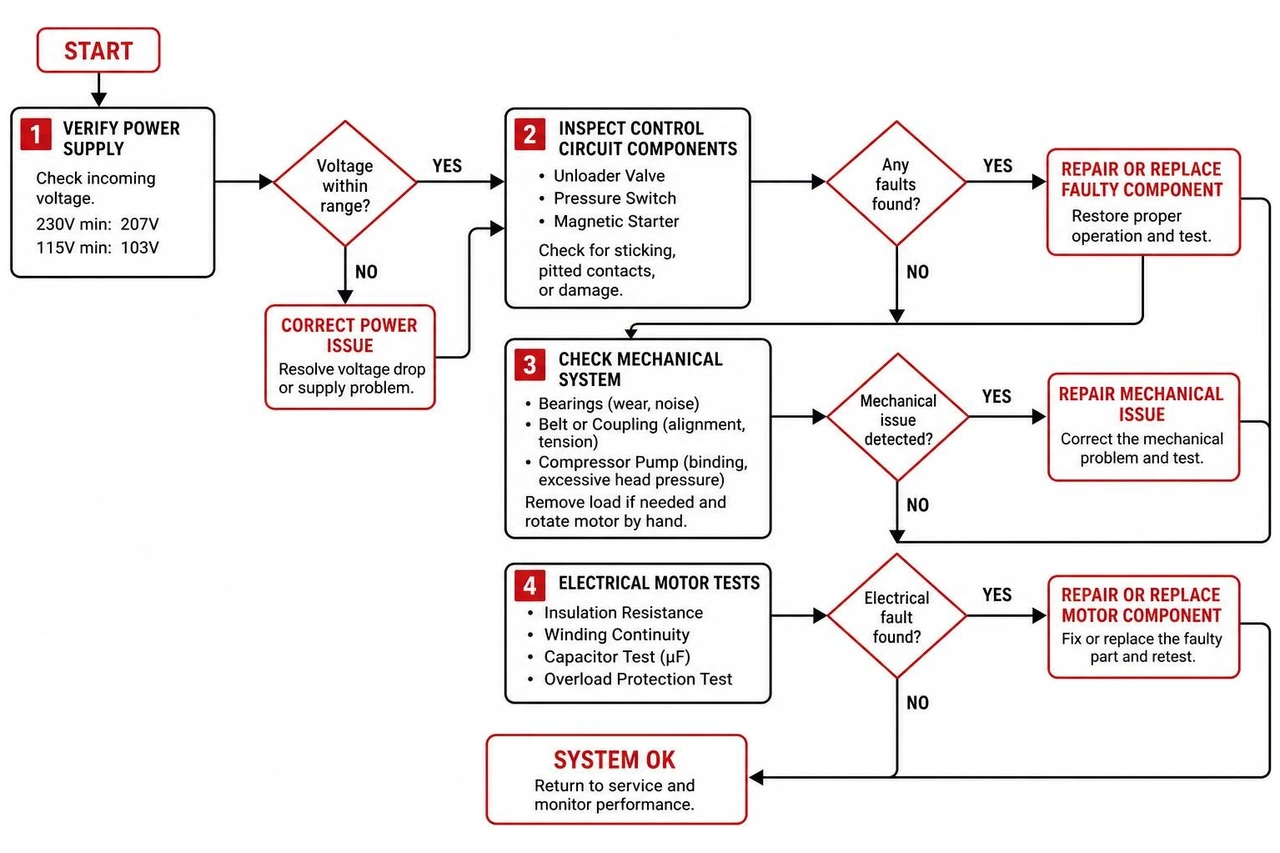
Before you condemn a motor, you must isolate the electrical supply and control systems from the mechanical pump and motor assembly.
First, verify the incoming power supply. A 230V single-phase or three-phase commercial motor requires a minimum starting voltage of 207V to operate safely. For smaller 115V auxiliary systems, the absolute minimum starting voltage is 103V. If your facility's voltage drops below these thresholds during peak shop hours, the motor will stall, draw locked-rotor amps, and trip the thermal overload or circuit breaker.
Next, inspect the control circuit components:
- The Unloader Valve: This critical valve releases trapped air from the compressor head when the motor shuts off. If the unloader valve fails, the motor must start against high head pressure. This mimics a dead motor by causing it to hum, overheat, and trip the breaker instantly.
- The Pressure Switch: Check the contacts inside the pressure switch. Pitted, burnt, or welded contacts can prevent the motor from receiving clean power on all phases.
- The Magnetic Starter: For motors rated at 5 HP and above, a magnetic starter is essential to handle high starting currents (often 22 to 48 Amps). Inspect the starter’s contactor and heater coils for damage.
For a technical deep dive into the structural demands of high-output shop motors, read about The Logic Behind 5hp Air Compressor Electric Motor | Industr.
Safety Protocols and Diagnostic Tools for Shop Technicians
Working on commercial air compressor motors exposes technicians to high voltage, intense mechanical pressure, and stored electrical energy. Safety is not optional. Before any diagnostic or repair work begins, technicians must implement strict lockout/tagout (LOTO) protocols to isolate the equipment from its power source.
Always discharge capacitors before touching any electrical terminals. High-capacity start and run capacitors can store a lethal electrical charge long after the main breaker is turned off. For a comprehensive overview of safety standards for industrial machinery, consult our Electrical Machine Repair Guide 2026.
Essential Tools for Air Compressor Motor Repair
To diagnose and service commercial compressor motors accurately, your shop's tool crib must be equipped with the following professional-grade instruments:
- Digital Multimeter (DMM): Used to verify incoming line voltage, test control circuit continuity, and measure capacitor microfarad (µF) ratings.
- Megohmmeter ("Megger"): Essential for testing the insulation resistance of the motor windings. A standard multimeter cannot supply enough voltage to detect subtle ground faults.
- Clamp-On Ammeter: Allows technicians to measure the current draw (amperage) on each phase while the motor is running under full load, comparing it directly to the nameplate Full Load Amps (FLA).
- Laser Pulley Alignment Tool: Essential for verifying precise belt alignment between the motor pulley and the compressor flywheel to eliminate vibration and bearing wear.
Testing for Ground Faults with a Megohmmeter
A ground fault occurs when the insulation surrounding the stator windings degrades, allowing electrical current to short-circuit directly to the motor's metal frame. This not only trips circuit breakers but also presents a severe electrocution hazard and can lead to catastrophic terminal venting.
Terminal venting occurs when a severe internal short-circuit vaporizes the terminal pins, causing highly pressurized oil and gases to spray out and potentially ignite. To safely test for a ground fault:
- Isolate the motor completely by disconnecting all incoming power leads from the terminal box.
- Set your megohmmeter to the appropriate test voltage (typically 500V DC for a 230V motor).
- Connect one test lead of the megger to a clean, unpainted spot on the motor’s metal frame (ground).
- Connect the other test lead to one of the motor winding terminals.
- Initiate the test and record the resistance reading. Standard guidelines dictate that any reading below 2.0 Megohms indicates severely degraded insulation, requiring a motor rewind or replacement. Repeat this test for all phases.
For detailed electrical safety specifications and internal wiring schematics, refer to the Hermetic Compressor service documentation.
Step-by-Step Electrical Component Replacement
Many air compressor motor repair jobs do not require touching the internal windings. For qualified shop technicians and facility maintenance personnel, replacing failing external electrical control components will often bring a stalled compressor back to life.
Replacing Start and Run Capacitors
Commercial single-phase compressor motors rely on start capacitors to provide the phase-shift torque required to spin the motor under load, and run capacitors to maintain operating efficiency. When a capacitor fails, the motor will hum loudly and trip the overload protector.
To replace a faulty capacitor:
- De-energize and Lock Out: Turn off the main breaker and disconnect the compressor from its power source.
- Discharge the Capacitor: Slide an insulated screwdriver across the capacitor terminals to safely bleed off any stored electrical charge.
- Test the Capacitance: Disconnect the wires and use a multimeter set to the microfarad (µF) setting. Compare the reading to the nominal rating printed on the capacitor casing. If the reading is more than 10% below spec, it must be replaced.
- Install the Replacement: Mount the new capacitor inside its gasketed protective cover, ensuring all wiring terminals are tight and secure to prevent vibration-induced arcing.
Replacing Thermal Protectors and Overload Switches
Most modern commercial motors feature an internal or external thermal overload switch designed to cut power if internal temperatures exceed safe limits. If this switch fails, the motor may refuse to start even after cooling down completely.
To replace an external overload switch or manual reset button:
- Access the motor connection box and locate the thermal protector.
- Use your multimeter to check for continuity across the switch contacts when the motor is cold. No continuity indicates a failed, permanently open switch.
- Disconnect the leads, unscrew the faulty switch, and install an OEM replacement with the exact same amperage and temperature trip rating.
- Verify that the magnetic starter's overload heaters are properly calibrated to match the motor's nameplate Full Load Amps (FLA) to prevent future premature trips.
The Economics of Motor Rewinding vs. Replacement
When a motor's stator windings are severely damaged or shorted, shop managers must make a financial decision: rewind the existing motor or replace it entirely.
To make the right choice, commercial facilities rely on the 65% Rule: If the total cost of rebuilding and rewinding the existing motor exceeds 65% of the cost of a brand-new, high-quality replacement motor, you should replace it.
| Motor Horsepower | Average Rewind & Rebuild Cost | New Premium Motor Cost | Recommended Action |
|---|---|---|---|
| 5.0 HP | $250 – $350 | $300 – $550 | Replace (especially if upgrading to premium efficiency) |
| 7.5 HP | $350 – $500 | $400 – $1,037 | Evaluate using the 65% Rule; high-end brands favor rewinding |
| 10.0+ HP | $500 – $800 | $900 – $1,800+ | Rewinding is highly cost-effective |
For shops operating premium equipment, such as Quincy Air Compressors, keeping these heavy-duty units running with OEM-spec components is vital for long-term reliability.
When is Motor Rewinding Cost-Effective?
Motor rewinding is highly cost-effective for larger commercial motors (typically 7.5 HP and above) where the cost of a new, name-brand industrial motor is substantial. A professional motor rebuild includes more than just new copper windings; it also involves replacing the rotor bearings, dynamically balancing the rotor shaft, and machining the end bells if wear is detected.
The primary drawback of rewinding is turnaround time. While a replacement motor can often be sourced and installed quickly, a professional stator rewind typically requires a 2-to-3-day turnaround at a specialized electrical machine shop.
Selecting and Installing a Replacement Motor
If you choose to replace the motor, you must match several critical physical and electrical specifications to ensure a seamless swap:
- NEMA Frame Size: Standardized frame sizes (such as 184T or 56HZ) ensure that the mounting bolt patterns, shaft height, and shaft diameter match your existing compressor base perfectly.
- Enclosure Type: Choose an Open Drip Proof (ODP) enclosure for clean, dry service bays. If your compressor is located in a dusty environment, opt for a Totally Enclosed Fan Cooled (TEFC) motor to protect the internals from airborne debris.
- Pulley and Shaft Alignment: When mounting the new motor, use a laser alignment tool to align the motor pulley with the compressor pump flywheel. Even a 1mm deviation can increase vibration levels by 40%, leading to premature bearing failure within three years.
For a comprehensive guide on selecting the correct frame and shaft configurations for industrial applications, see Air Compressor Motor: Select, Swap, Fix - GiantAir.
Frequently Asked Questions about Compressor Motors
Why does my shop compressor motor trip the circuit breaker on startup?
This is usually caused by a failed unloader valve that is trapping pressurized air over the compressor pistons, forcing the motor to start under extreme load. Other common causes include a weak circuit breaker, low line voltage, or a failing start capacitor that cannot provide the necessary starting torque.
What is the minimum starting voltage for a 230V commercial compressor motor?
The absolute minimum starting voltage for a nominal 230V commercial motor is 207V. If the voltage drops below this level during startup, the motor's torque output drops significantly, causing it to stall, overheat, and draw locked-rotor currents.
How often should commercial air compressor motors be lubricated?
For standard commercial automotive shops, compressor motor bearings should be greased every 6 months using a high-quality polyurea-based electric motor grease. Avoid over-greasing, as excess grease can migrate into the winding insulation and cause premature electrical failure.
Conclusion
Maintaining a reliable, high-performing compressed air system is essential for keeping your commercial service bays productive and profitable. While basic troubleshooting can help you identify minor electrical faults, complex diagnostics, heavy motor rewinding, and precise laser alignments are best left to the professionals.
At AutoTech Solutions, we are dedicated to minimizing your shop's downtime. As a premier one-stop-shop for automotive equipment sales, professional car lift installation, and service, we provide rapid-response repair and expert preventative maintenance across Michigan and the Carolinas—including Novi, Charlotte, Raleigh, and Wade. Whether you need an emergency motor replacement or a comprehensive preventative maintenance program to protect your equipment, our factory-trained technicians are here to help.
Don't let a failing compressor motor halt your shop's operations. Schedule professional equipment support with AutoTech Solutions today to keep your service bays running at peak efficiency.