How to Fix a Hydraulic Cylinder Without Prolonging Shop Downtime
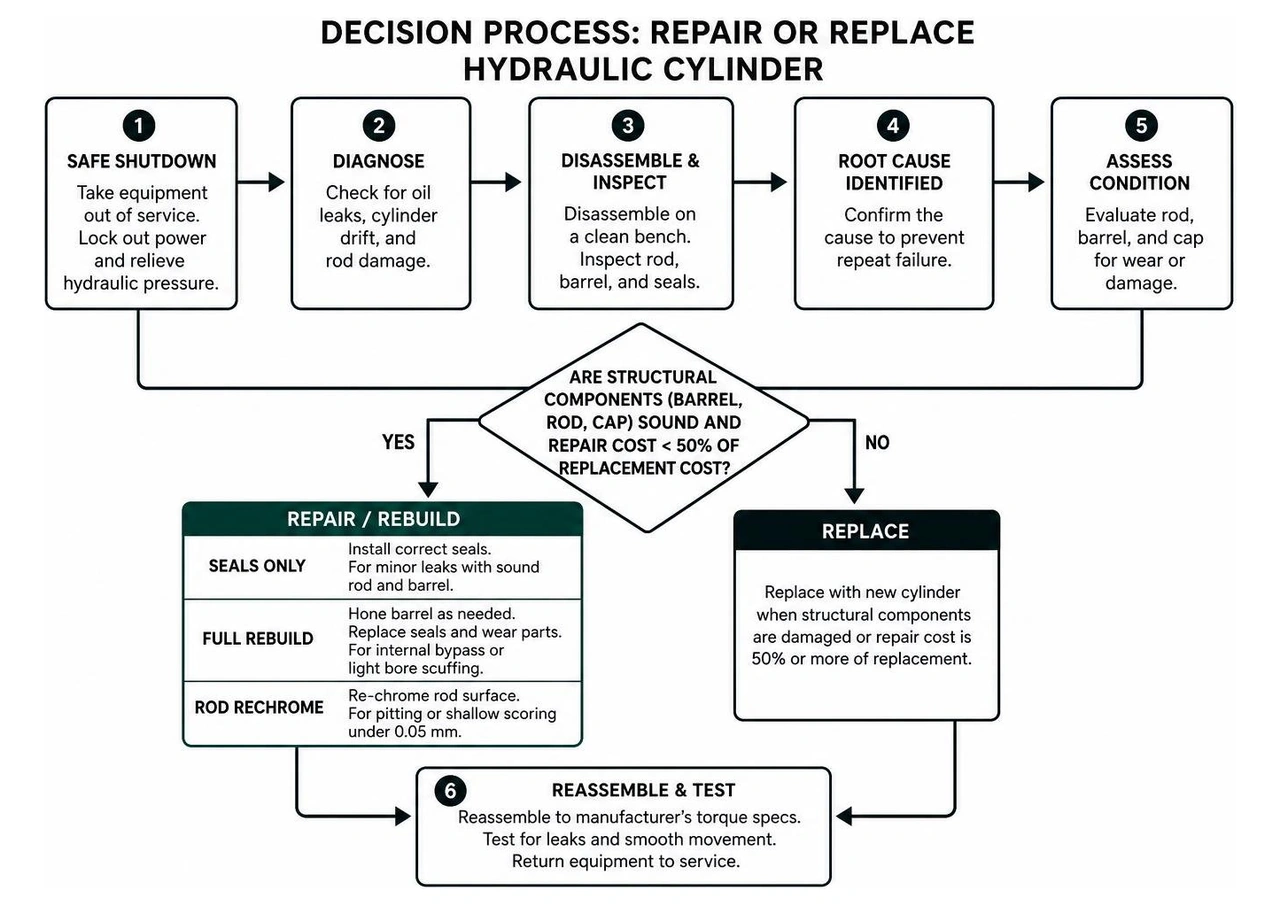
Start by taking the equipment out of service. Secure the lift or machine, lock out power, and relieve hydraulic pressure. Check for oil leaks, cylinder drift, and rod damage. Then have a qualified technician disassemble the cylinder on a clean bench, inspect the rod and barrel, and fit the correct seals. Reassemble it to the manufacturer's torque specifications and test for leaks and smooth movement before returning it to service.
A new seal alone will not fix a scored rod or a damaged bore. Finding the cause of the failure helps avoid a second shutdown.
We are AutoTech Solutions Staff, and this guide walks through the checks that matter most for commercial shop equipment.

Diagnosing Hydraulic Cylinder Failure in Commercial Shop Equipment
When a heavy-duty actuator fails in a busy shop bay, everything stops. Hydraulic linear actuators generate immense force to run automotive lifts, frame-straightening racks, and heavy shop presses. When fluid power fails, bay downtime can quickly lead to substantial revenue loss.
Accurate actuator diagnostics require looking beyond surface symptoms to identify the root cause of pressure loss or contamination. In professional environments, managing full-facility upkeep through comprehensive automotive equipment repair helps maintain everything from air delivery systems to fluid lines.

Common Symptoms: Leaks, Drift, and Sticking
Actuator failures generally fall into three distinct diagnostic categories:
- External Gland Leakage: Fluid pooling around the cylinder nose indicates that the rod seal, buffer ring, or outer wiper seal has degraded. This is often caused by fine particulate contamination scratching the sealing lips or ambient grit slipping past a worn wiper.
- Internal Bypass and Cylinder Drift: If an automotive lift gradually creeps downward while loaded or fails to hold rated pressure, hydraulic fluid is slipping past the piston seals. While cylinders with cast-iron piston rings have an acceptable normal bypass rate of roughly 5 cc per minute per inch of cylinder bore diameter, soft elastomeric seals should exhibit zero bypass. Excessive bypass points to worn piston cups, degraded backup rings, or an out-of-round barrel.
- Jerky, Erratic Movement and Overheating: Sticking or "chattering" during extension usually points to mechanical binding from a bent rod, side loading from misaligned lift columns, or trapped air within the hydraulic column. When fluid rapidly forces its way past blown internal packings, extreme fluid friction generates localized heat, accelerating seal hardening and breaking down fluid viscosity.
Repair vs. Replace Assessment for Commercial Actuators
Deciding whether to rebuild an existing actuator or install a brand-new assembly depends on structural integrity, turnaround time, and repair economics. As an industry rule of thumb, a cylinder is worth repairing when total rebuild costs remain below 50% of the replacement cost of a new unit, provided the primary structural components (the barrel tube, rod, and cap) remain sound.
| Service Scope | Typical Cost Range | Turnaround Lead Time | Replacement Criteria / Trigger Points |
|---|---|---|---|
| Standard Seal Kit Replacement | $150 – $500 | 1 – 2 business days | Minor fluid weeping; barrel and rod surfaces remain free of deep scratches. |
| Full Mechanical Rebuild (Honing, Bushings, Packings) | $500 – $2,000 | 2 – 5 business days | Internal bypass present; light bore scuffing; gland bearing shows moderate clearance wear. |
| Rod Surface Re-Chroming | $200 – $800 | 1 – 2 weeks | Localized micro-pitting, flaking chrome, or shallow longitudinal scoring under 0.05 mm depth. |
| Barrel Honing & Machining | $100 – $400 | 2 – 4 business days | Minor internal bore glazing, taper, or light surface rust without deep wall gouges. |
| Complete Unit Replacement | $800 – $4,000+ | Immediate to 6 weeks | Barrel wall cracked or bulged; rod bent >0.5 mm/m; repair exceeds 50% of new unit value. |
Professional Hydraulic Cylinder Repair Process Step-by-Step
Executing a reliable rebuild demands cleanroom-grade cleanliness, specialized shop equipment, and strict adherence to established engineering standards, such as standard manufacturer hydraulic cylinder repair guidelines.
Step 1: Safe Teardown and Disassembly for Hydraulic Cylinder Repair
Before loosening any mechanical fastener, implement strict Lockout/Tagout (LOTO) protocols at the electrical power unit. Fully lower the lift carriage or mechanical load onto its mechanical safety locks to relieve all residual static hydraulic head pressure.

- Port Plugging and External Cleaning: Thoroughly degrease the outside of the assembly and plug all fluid ports before mechanical teardown to avoid introducing abrasive grit into the internal chambers.
- Mounting on Teardown Bench: Secure the base clevis in a dedicated heavy-duty cylinder bench vice. Never clamp the active chrome rod in bare steel jaws.
- Head and Gland Disassembly: For threaded-head cylinders, loosen the external locking set screw, then engage an adjustable pin-face or hook spanner wrench to unscrew the gland. For wire-ring retention designs, retract the rod slightly, depress the internal head into the tube using a soft-faced mallet to expose the internal wire groove, unseat the retaining wire, and smoothly withdraw the gland.
- Piston Withdrawal: Draw the chrome rod straight out of the barrel along its centerline. Avoid rocking or cocking the piston assembly, which can gouge the honed internal barrel tube.
Step 2: Component Inspection, Machining, and Surface Re-Chroming
Once the actuator is stripped, wash all metal components in an agitated solvent tank and dry them thoroughly with lint-free shop cloths:
- Piston Rod Straightness: Place the rod on precision V-blocks and measure radial runout using a dial indicator. If rod straightness deviates by more than 0.5 mm per meter of length, it must be straightened on an arbor press or replaced. Inspect the surface for peeling chrome, deep scoring, or pitting. Re-chroming is generally viable for rods up to 80 mm in diameter and 2,000 mm in length; beyond these limits or with scoring deeper than 0.05 mm, a replacement blank is more economical.
- Barrel Bore Condition: Using an internal three-point bore micrometer, check the tube interior for ovality, barrel bulges, or longitudinal scoring. Light scratching can be cleaned up using a rigid cylinder hone with fine-grit stones, provided the internal bore diameter remains within original engineering clearances.
- Piston and Gland Bushings: Inspect the bronze or composite guide bushings for abnormal wear patterns, which suggest column misalignment or excessive side-loading.
Step 3: Seal Selection and Precision Reassembly for Hydraulic Cylinder Repair
Selecting appropriate seal materials depends directly on operating pressures, cycle speeds, and hydraulic fluid chemistries:
- Nitrile (NBR - 70 to 90 Shore A): Excellent all-around elasticity and wear resistance for mineral-based hydraulic oils at standard operating temperatures (-20°F to 210°F).
- Polyurethane (PU): High tensile strength and abrasion resistance, making it ideal for primary dynamic U-cup rod and piston seals operating under high pressures (up to 5,000 psi).
- Fluoroelastomers (Viton / FKM): Mandatory for high-temperature commercial environments (up to 400°F) or synthetic fluid lines.
- PTFE / Bronze-Filled Wear Bands: Provide low-friction guidance, eliminate metal-to-metal contact between the piston and barrel wall, and prevent stick-slip motion.
During installation, follow the detailed packings sequence outlined in the high-pressure cylinder operating instructions. Use smooth plastic installation cones or brass seal picks. Sharp steel screwdrivers can nick sealing lips and cause immediate leaks. Coat all packings, backup rings, and internal tube surfaces in clean hydraulic oil before reinserting the piston.
Torque Specifications and Testing Across Cylinder Types
Improper fastener torque during reassembly is a leading cause of premature failure in rebuilt shop actuators.
| Cylinder Architecture | Primary Fastener / Retaining Component | Fastener Size / Bore Dimension | Specified Torque Target | Critical Reassembly Notes |
|---|---|---|---|---|
| Tie-Rod Style | Tie-Rod Nuts (Grade 8) | 1.50-inch Cylinder Bore | 20 ft-lb (27 N·m) | Tighten diagonally in a cross-pattern across 3 progressive torque stages. |
| Tie-Rod Style | Tie-Rod Nuts (Grade 8) | 8.00-inch Cylinder Bore | 700 ft-lb (950 N·m) | Ensure lubricated threads; verify equal tie-rod stretch during tightening. |
| Piston Retaining Nut | UNF Locknut | 3/8"-24 UNF Thread | 25 – 30 ft-lb (35 – 42 N·m) | Clean threads with solvent; apply medium-strength thread-locking compound. |
| Piston Retaining Nut | UNF Locknut | 1-3/4"-12 UNF Thread | 800 – 900 ft-lb (1,085 – 1,220 N·m) | Use heavy-duty torque multiplier; replace single-use nylon locking nuts. |
| Threaded-Head Gland | Outer Cylinder End Cap | Standard Commercial Bore | 440 ft-lb (600 N·m) | Coat threads with anti-seize paste to prevent galling on tube threads. |
| Threaded-Head Gland | End Cap Retaining Set Screw | Standard Set Screw | 6 ft-lb (8 N·m) | Snug firmly against gland to prevent rotational back-off during cycling. |
Tie-Rod, Welded, and Wire-Ring Cylinder Procedures
Each cylinder design requires a slightly different assembly approach:
- Tie-Rod Cylinders: Place the barrel squarely between the end caps. Thread the nuts on finger-tight and torque them in a crisscross sequence to prevent uneven stresses on the tube seals.
- Threaded-Head Cylinders: Generously apply anti-seize compound to the gland threads. Torque the end cap to 440 ft-lb using an appropriate spanner wrench, then secure the retention set screw to 6 ft-lb.
- Wire-Ring Cylinders: Slide the gland assembly into the tube until it bottoms against the internal stop shoulder. Seat the internal wire ring into its groove using a band clamp, then pull the rod outward until the gland seats firmly against the lock wire.
Bypass, Drift, and Hydrostatic Pressure Testing
Every rebuilt actuator must undergo pressure testing before being reinstalled on shop equipment:
- Purging Air: Cycle the cylinder across its full stroke 3 to 5 times under low pressure (roughly 100 to 200 psi) with ports oriented upward to purge trapped air.
- Hydrostatic Static Hold Test: Secure the cylinder with mechanical restraints. Apply test pressure at 1.5 times the rated working pressure to both the extend and retract ports. Hold pressure for a minimum of 3 minutes per port while inspecting the gland seal, static tube seals, and ports for leaks.
- Mid-Stroke Drift Test: Pressurize the blind end to rated working load, hold the piston mid-stroke with a closed needle valve, and monitor a precision dial indicator. Any downward drift confirms internal piston bypass.
When troubleshooting fluid power circuits, line failures can mimic cylinder bypass. If you spot cracked supply lines or weeping couplings during testing, source professional emergency hydraulic hose and fitting repair to keep the entire pressure loop operating reliably.
Preventive Maintenance and Contamination Control for Extended Cylinder Life
Solid particulate contamination causes more than 75% of hydraulic component failures. Keeping fluid clean is essential for protecting cylinder seals and polished metal surfaces.

Commercial shops should monitor fluid condition closely, targeting an ISO 4406 cleanliness rating of 17/15/12 or cleaner. High-efficiency return-line filters paired with regular fluid sampling help catch particulate buildup before it scuffs rods or cuts seal lips. Incorporating these checks into scheduled car lift maintenance helps keep commercial bays operating safely.
For complete facility upkeep across lifts, compressors, and air lines, following a structured preventative maintenance service guide keeps your equipment running smoothly. Partnering with a dedicated industrial equipment service provider ensures that high-pressure components are inspected, rebuilt, and certified to meet demanding safety standards.
Frequently Asked Questions About Hydraulic Cylinder Repair
How much does professional hydraulic cylinder repair cost compared to replacement?
A standard reseal on a commercial automotive lift cylinder typically ranges between $150 and $500, depending on bore size and packings material. A full mechanical rebuild—including bore honing, gland bushing replacement, and new packings—ranges from $500 to $2,000.
By contrast, a brand-new commercial-grade replacement cylinder runs from $800 to over $4,000. Choosing a professional rebuild saves significant money while restoring the actuator to original factory operating tolerances.
What is the most common cause of hydraulic cylinder failure in auto lifts?
The leading cause of lift cylinder breakdown is fluid contamination combined with rod seal wear. When external wiper seals wear down, abrasive road dust, metal shavings, and chemical degreasers enter the gland. These abrasives score the micro-polished chrome finish on the rod, creating fine leak paths across the primary U-cup seals that quickly result in external fluid puddles and loss of lifting force.
When should a hydraulic cylinder rod be replaced instead of re-chromed?
A piston rod should be scrapped and replaced with a new induction-hardened chrome rod blank if:
- Overall straightness deviation exceeds 0.5 mm per meter of length.
- Deep longitudinal gouges, dents, or pitting penetrate deeper than 0.05 mm, making standard grind-and-plate passes uneconomical.
- Chrome plating has begun flaking or delaminating over large surface areas.
- The rod diameter is worn out-of-round beyond allowable seal clearance specifications.
Conclusion
Unplanned bay downtime cuts directly into commercial fleet productivity and shop revenue. Keeping your hydraulic actuators operating safely requires fast diagnostic troubleshooting, precision rebuilding, and thorough pressure testing.
AutoTech Solutions delivers comprehensive, turnkey shop equipment sales, professional installation, field repair, and planned maintenance programs designed to keep commercial automotive bays operating at peak performance. With fully equipped service hubs and factory-trained mobile technicians serving commercial operations across Charlotte, NC, Raleigh, NC, Wade, NC, and Novi, MI, our service teams respond quickly to resolve high-pressure hydraulic failures on-site.
Contact AutoTech Solutions today to schedule your professional hydraulic lift cylinder repair and keep your equipment running with minimal downtime.