How to Choose a Car Lift Cylinder Seal Kit Without Delaying Repairs
Procure a car lift cylinder seal kit by cylinder type, not lift model alone. Record the lift model and serial number, then check the cylinder's stamp, design, and measurements against the kit listing. Most kits rebuild one cylinder, so order two if both columns need service. Keep each bag sealed until a qualified shop technician can compare the old seals with the new ones.
A leaking or drifting lift can disrupt a commercial bay, but a seal kit is only the right repair if the cylinder itself is sound. This guide covers the six steps from identifying the cylinder through rebuilding and testing it. We are the AutoTech Solutions Staff, and we'll start with the signs that call for a closer inspection.
Diagnosing Hydraulic Failure in Commercial Auto Lifts

In high-throughput service centers, fleet maintenance facilities, and collision repair shops, hydraulic lifts endure relentless daily duty cycles. Recognizing the early symptoms of hydraulic failure prevents catastrophic downtime and protects shop floor safety.
Hydraulic fluid pooling around the cylinder base or trailing down the chrome piston rod indicates that the primary rod seal or wiper has failed. However, internal hydraulic failures are often invisible. When a lift slowly creeps downward under load—known as cylinder drift—the piston seal inside the barrel has degraded, allowing pressurized fluid to bypass the piston head.
Internal bypass and pressure loss represent common causes of automotive lift downtime in busy service centers. When the hydraulic seal loses elasticity, shop technicians may also observe jerky carriage elevation or uneven rising between columns.
Seal breakdown is accelerated by contaminated ISO AW32 hydraulic oil, thermal breakdown, and particulate friction. Establishing proactive inspection routines, as detailed in our preventative maintenance lift guide, helps commercial shop managers address degraded packings before internal wall scoring forces complete cylinder replacement. For broader industry context on hydraulic system failures, the Machinery Lubrication guide to hydraulic seal failure outlines common contamination and thermal degradation patterns.

Step 1: Matching Cylinder Types to the Correct Car Lift Cylinder Seal Kit
Ordering replacement parts based strictly on the lift's nameplate often leads to mismatched seals. Major automotive lift manufacturers frequently sourced hydraulic cylinders from multiple tier-one hydraulic suppliers across different manufacturing years. Sourcing the right car lift parts requires verifying physical cylinder specifications, including outer barrel dimensions, stroke length, and stamped manufacturer markings.
| Cylinder Manufacturer / Style | Common Lift Makes & Capacities | Identifying Stampings & Markings | Cylinder Height / Bore Dimensions | Distinguishing Visual Features |
|---|---|---|---|---|
| Texas Hydraulics | Direct-acting 2-post lifts (7,000–9,000 lbs) | Stamped TXT, TH, FJ7664, FJ783, or FJ7311 | ~72" Height; standard direct-plunger bore | Small top bleeder screw; multi-color piston seal rings (yellow, blue, black) |
| Pacoma / Hyco | Precision 2-post lifts, 36000–120000 series (7,000–9,000 lbs) | Stamped Pacoma, Hyco, or Made in Germany ~6" below bleeder | ~68" or 72" Height; German precision metric bore | 5/8" hex bleeder screw at top; blue double-lipped piston seal |
| Import Style | Direct-acting 2-post lifts (7,000–10,000 lbs) | Lacks domestic stamps; smooth satin black finish | ~72.5" Height; chrome rod exiting bottom of barrel | Gland face has two spanner wrench holes; uses round internal locking wire ring; blue/green cup seals |
| Holmac Chain-Over | Commercial chain-over models (20000–35000 series) | Stamped teardrop emblem with HC inside; SSN-format serials | 2.50" Bore × 36.50" Stroke | Gland matches barrel outer diameter (protrudes 1/4"); 2 spanner holes; top breather bung |
| Waltco Chain-Over | Chain-over commercial hoists (7,000–9,000 lbs) | Stamped Waltco identification marks | 36.00" Stroke; chain-over carriage architecture | Chain rides directly over cylinder top; top-mounted chain sheaves |
| Heavy Cable-Actuated | Commercial 4-Post Cable Lifts (12,000 lbs) | Stamped HC or H inside a teardrop emblem | Commercial 4-post heavy-duty bore | Designed specifically for cable pull cylinders (does not fit chain versions) |
Choosing a Car Lift Cylinder Seal Kit by Hydraulic Manufacturer
Understanding the origins of your hydraulic cylinders streamlines fleet procurement.
- Texas Hydraulics Cylinders: Found widely on domestic two-post lifts. A versatile aftermarket rebuild kit such as the FJ783-12TH Hydraulic Cylinder Seal Kit is designed to service over 20 distinct lift configurations (including SP84, SPOA84, SPO88, SPOA88, SP98, SPOA98, SPO9, and SPOA9). These kits package multiple piston seal variants to match different manufacturing revisions.
- Pacoma / Hyco Cylinders: Precision German assemblies utilized in commercial units. Technicians servicing these units select the cylinder seal kit / rebuild Kit Seals 11014, which fits 36000 through 120000 series lifts. These kits will not interchange with domestic or imported knockoff rams.
- Import Style Cylinders: High-volume modern lifts often utilize imported cylinder assemblies. For these configurations, the 2 post Cylinder Seal Kit / rebuild 9-10k lbs (YG32-9180) supports 15 separate commercial models, including DP97A, DP10, and I10 series.
- Chain-Over & Cable Cylinders: Specialized commercial hoists require dedicated seals. The 2 Post Auto Lift Cylinder Rebuild Seal Kit 11013 services Holmac 2.50" bore cylinders, while the 2 Post Auto Lift Cylinder Rebuild Seal Kit 991192 manages Waltco 36" stroke units. For commercial 4-post platforms, the 4 Post Lift Cylinder Rebuild Seal Kit bh-7213-86sk addresses heavy cable-actuated rams.
Visual Identification: Stampings, Bleeder Screws, and Piston Colors
When service plates are obscured or painted over, visual mechanical inspection ensures accurate sourcing:
- Stampings and Emblems: Locate the physical stamp on the cylinder barrel. Domestic units feature clear alphanumeric strings (
TXT,TH,FJ7664). German Pacoma units feature text stamped approximately 6 inches below the top bleeder screw. Holmac and cable-actuated barrels display a distinctive teardrop logo withHCorHcentered inside. - Bleeder Hardware and Gland Architecture: Texas Hydraulics cylinders use a compact, low-profile bleeder screw at the top of the barrel. Pacoma/Hyco cylinders utilize a prominent 5/8" hex bleeder screw. Chinese import cylinders feature an inverted orientation hanging from the column top with two precision spanner holes machined into the exposed gland face.
- Piston Seal Profiles and Color Coding: Disassembled pistons reveal proprietary geometries. Pacoma systems utilize a distinctive blue double-lipped polyurethane seal. Chinese cylinders utilize solid blue or green cup-style packings. Texas Hydraulics cylinders incorporate interchangeable yellow, blue, or black square-ring and energizer combinations.
Commercial Procurement: Pricing, Order Quantities, and Warranty Terms

Managing repair parts budgets requires understanding why seal kit pricing varies across commercial applications. Entry-level replacement kits for standard direct-acting rams—such as the standard FJ783-12TH ($26.47) or the 11014 kit ($39.90)—deliver essential elastomer rings for standard maintenance. Intermediate kits for chain-over and heavy four-post systems range between $59.06 (YG32-9180), $68.25 (11013), and $104.00 (FP-12G series). Premium commercial kits, such as the high-capacity YG01-9180 ($199.00) or complete 9K commercial replacement kits ($129.99), incorporate high-pressure rod wipers, heavy bronze-filled guide bands, and integrated hardware backed by a 1-year warranty.
Effective downtime reduction during lift repair relies on ordering the correct quantities. A single seal kit package contains the components required to overhaul exactly one hydraulic cylinder. Because dual-column lifts experience equal wear and pressure distribution across both sides, best practice dictates ordering two kits to overhaul both cylinders simultaneously.
Commercial suppliers maintain a strict non-returnable policy once the internal sealed polybag is opened. Elastomeric components are vulnerable to atmospheric ozone, particulate contamination, and accidental stretching during bench inspection. Technicians must visually verify component profiles through the transparent packaging before breaking the factory seal.
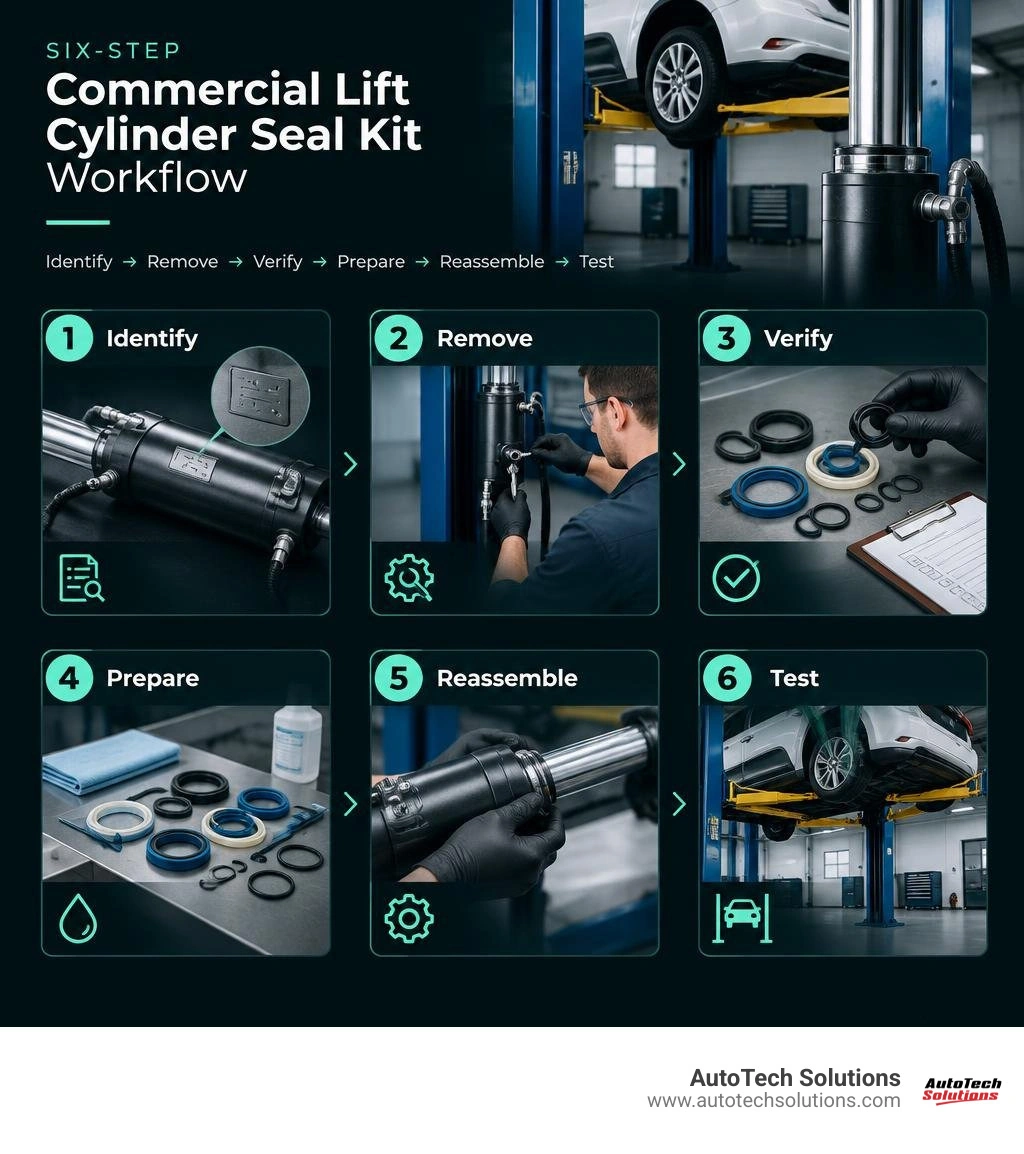
Rebuilding Commercial Lift Cylinders in Six Steps
Rebuilding a hydraulic lift cylinder requires strict adherence to safety standards. Secure the service bay, lower the carriage entirely onto mechanical locks, perform electrical lockout/tagout (LOTO) on the hydraulic power unit, and relieve all residual hydraulic line pressure before starting a two-post lift repair procedure.
Step 2: Safe Cylinder Removal and Teardown
- Disconnect the hydraulic supply hose and install protective caps on exposed fittings to prevent contamination.
- Unbolt the top mounting hardware and lower clevis pins, then carefully extract the cylinder assembly from the lift column.
- Secure the cylinder barrel horizontally in a heavy shop bench vise equipped with soft copper or aluminum jaw caps to prevent barrel deformation.
- Unscrew the cylinder gland end cap using an adjustable pin spanner wrench or heavy-duty pipe wrench positioned squarely over the reinforced collar. For cylinders featuring round internal retaining wire rings, rotate the gland while extracting the wire through the milled slot.
- Pull the chrome piston rod straight out from the barrel in a smooth, continuous motion to avoid scoring the internal cylinder bore.
- Drain the spent hydraulic oil into an environmentally safe waste collection system and clean the internal barrel using a lint-free shop swab. Review our dedicated guide on hydraulic lift cylinder repair for evaluating internal barrel scoring limits.
Step 3: Verifying Seal Dimensions Before Bag Opening
Before breaking the sealed packaging of your new car lift cylinder seal kit, place the new seals directly over the disassembled components:
- Lay the transparent kit flat on the workbench directly beside the removed components.
- Visually compare the cross-sectional geometry of the rod seal, piston seal, guide bands, and dust wiper.
- Measure the exposed metallic piston lands and rod shaft diameter using vernier calipers, cross-referencing inner diameter (ID) and outer diameter (OD) measurements against the sealed parts.
Step 4: Preparing the Car Lift Cylinder Seal Kit for Installation
Once dimensions are verified, open the packaging in a clean workspace:
- Use brass or polymer seal picks to remove the old seals from the piston and gland grooves. Never use hardened steel screwdrivers, which can scratch precision sealing grooves.
- Clean all gland and piston seal grooves using a non-chlorinated solvent, then wipe completely dry.
- Inspect machined edges for burrs; dress minor imperfections with 600-grit emery cloth and thoroughly flush away debris.
- Coat all new seals, O-rings, wear rings, and piston glands generously with clean, non-foaming ISO AW32 hydraulic oil.
- Install the rod seal into the internal gland groove, ensuring the sealing U-cup lip faces toward the high-pressure side (the cylinder interior). Snap the external rod wiper into the outer groove with the scraping edge oriented outward.
Step 5: Gland Reassembly and Torque Specifications
- Install the energized piston seal and secondary wear rings into their respective piston head grooves. For multi-piece kits, ensure the elastomeric energizer ring is seated flat beneath the outer wear ring without twists.
- Slide the rebuilt rod gland onto the chrome shaft, taking care not to nick the inner rod seal on the piston rod threads or chamfered shoulder.
- Lubricate the cylinder barrel opening and insert the piston assembly straight into the honed tube using a piston seal compressor or smooth rocking motion.
- Thread the gland into the barrel tube. Tighten the gland securely to manufacturer specifications (typically 110 ft-lbs for threaded commercial collars) or re-engage the round internal lock wire until fully seated.
Step 6: Bleeding, Pressure Testing, and Return-to-Service
- Reinstall the rebuilt cylinder into the lift column, securing all structural pins and clevis hardware.
- Reconnect hydraulic lines, ensuring all JIC/O-ring boss (ORB) fittings are torqued cleanly without thread sealant tape, which can shed particles into the valves.
- Fill the power unit reservoir with fresh, non-detergent ISO AW32 hydraulic oil (typically 12 quarts for commercial two-post units).
- Crack open the top bleeder screw (or 5/8" hex fitting on Pacoma units). Raise the lift carriages 6 inches until bubble-free fluid emerges, then securely tighten the bleeder valve.
- Cycle the lift through multiple full-stroke elevations without load to verify smooth travel and synchronize safety latches across both columns.
- Conduct a static pressure hold test at the rated system operating pressure (up to 2,320 PSI) to confirm zero seal bypass, completing your car lift maintenance workflow.
Frequently Asked Questions about Hydraulic Lift Seal Rebuilds
How many seal kits are required to service a commercial two-post lift?
A commercial seal kit package contains the components required to overhaul a single hydraulic ram. While an isolated leak may appear on one column, automotive lift hydraulic systems balance fluid pressure across both sides.
When one cylinder's packings fail from age or oil breakdown, the opposite cylinder has experienced identical operating hours and thermal stress. Best practice requires ordering two complete kits and rebuilding both columns simultaneously to ensure balanced hydraulic performance and eliminate secondary downtime.
Why are opened hydraulic cylinder seal kits strictly non-returnable?
Automotive equipment distributors enforce a strict non-return policy on opened seal packages due to contamination and structural integrity concerns. Hydraulic packings depend on precise elastomeric profiles that can absorb ambient humidity, attract fine bay dust, or suffer micro-tears during test fitting.
Once the sealed factory polybag is compromised, the components cannot be certified as clean or uninstalled for subsequent commercial customers. Always compare component dimensions through the clear polybag prior to opening.
What tools and turnaround time are standard for shop technicians?
A commercial lift cylinder overhaul requires a bench vise with non-marring jaw caps, an adjustable pin spanner wrench, a brass seal pick set, vernier calipers, a torque wrench, clean lint-free swabs, and fresh ISO AW32 hydraulic oil. Experienced shop technicians typically complete a single cylinder teardown, repack, and reinstallation in under 60 minutes.
For complete step-by-step service intervals and bay safety checklists, review our comprehensive auto lift repair guide.
Conclusion
Maintaining hydraulic integrity is essential for running an efficient, safe commercial repair shop. By accurately identifying cylinder manufacturers via stamped markings, verifying seal packings before opening packaging, and following strict reassembly procedures, fleet and shop operators protect bay productivity while avoiding costly cylinder replacements.
When commercial facilities throughout Charlotte, NC, Raleigh, NC, Wade, NC, and Novi, MI require professional equipment overhauls, preventative maintenance agreements, or factory-certified installations, AutoTech Solutions delivers industry-leading response times and field support. Connect with our team for certified equipment repair and support services to keep your shop's lifting infrastructure operating at peak performance.